PLOTTER OUTPUT
Plotter Output is deprecated in Proteus 9
Overview
Windows support for Pen plotters is, unfortunately, very poor. Although drivers are supplied for HPGL and other plotters, the implementation of these drivers is very sketchy. Better drivers may be available for particular plotters, but we have not relied on this in designing the plotter support within Proteus. Instead, we rely on the Windows plotter driver only to draw straight lines and then Proteus itself does the rest. To do this, it uses the plotter driver module from the DOS version. This module allows control of the following options which are adjusted using the Set Plotter command on the System menu.
Plotter Pen Colours
The plotter drivers are able to generate a multi-coloured plot when ALL layers are selected on the Print dialogue form.
The Set Plotter command on the System menu is used to determine the colours for each layer. Where through hole pads are encountered, the pen number is determined by ORing the colours for the outer layers of the pad in the same way as is done for screen colours.
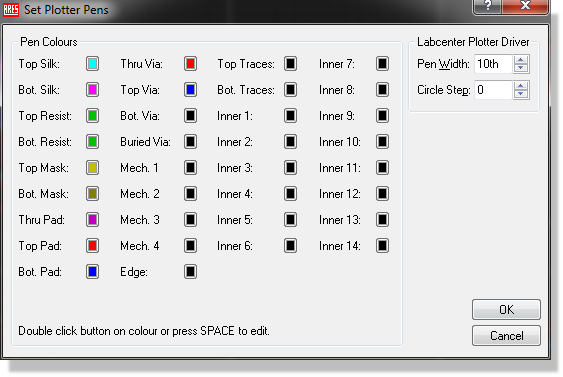
Note that this only applies to an ALL layers plot - single layer plots always use the black pen.
Unfortunately, the Windows plotter drivers do not (as far as we have been able to find out) support the direct selection of plotter pens by number. Therefore it is up to you to find out how your plotter driver maps colours onto pens and to select appropriate colours on the Set Plotter Pens dialogue.
Plotter Tips
On the Set Plotter command form are fields for Pen Width and Circle Step.
Pen width
This is a value in thou which should correspond (at least initially) to the width of pen you are using.
Circle step
This value is the size of step (in thou) that the layout will use when plotting the outer radius of a 1 inch diameter pad. A smaller number results in faster but more jagged circular pads whilst a value of 0 will instruct Proteus to use the plotters internal circle drawing command. Whilst this is generally fast and smooth, it does mean that the pen is picked up and put down for each pass round the pad.
Getting high quality plots will require experiment with pens, film, ink, and the settings described above. You may also find it necessary to tweak the sizes of some of the pad, via and trace styles the problem is that there are too many variables outside our control to guarantee that the dimensions of plotted objects will accurately tie up with their nominal size. As a starting point, we recommend a 0.25mm or 0.30mm tungsten carbide tipped pen, professional drafting film (obtainable from a good stationers) and Marsplot 747 ink.
Finally, the Line Width command on the Text Style command form is ignored when plotting a single pass of the pen is used for all silk screen graphics for reasons of speed. If you need a different line thickness, use a thicker pen for your silk screen plots!