FILING COMMANDS
Introduction
The Proteus schematic module makes use of the following file types:
- Project Files (.PDSPRJ)
- Workspace Files (.WORKSPACE)
- Project Clips (.PDSCLP)
- Module Files (.MOD)
- Library Files (.LIB)
- Backup Files (.PDSBAK)
All data from the schematic is collated and stored as part of the main Proteus project file with extension 'PDSPRJ'. This is a compound file containing the schematic data, the layout data, the project database and potentially other simulation related files. When you save over an existing project, the version you are replacing is kept as a backup; the name it is given is explained under Saving the Project.
Information about which modules are open in Proteus (e.g. Schematic, Bill of Materials and Layout) together with their positions on your monitor(s) and which frames they are in are stored in the project workspace file. This allows you to return to the same project state when you reload a project.
A section of a schematic can be exported to a project clip and subsequently read into another project. Project clips have the extension 'PDSCLP' and are read and written by the Import Project Clip and Export Project Clip commands on the File menu.
Module files have the extension 'MOD' and are used in conjunction with the other features for hierarchical design. See Hierarchical Designs for further information.
Symbol and device libraries have the extension 'LIB'.
The Proteus VSM simulation system uses other file types as well. See the VSM manual for further details.
Starting a New Project
To start a new design you need to create a new Proteus project. You do this by invoking the New Project Wizard either from the home page or from the file menu. This wizard guides you through the setup of your next Proteus project. There is a start page in which you specify the project name and destination directory and then potentially three main screens for schematic, PCB and firmware. The File menu also offers New Flowchart Project, for a visual designer project, and Open Sample Project, which opens the sample browser.
Schematic
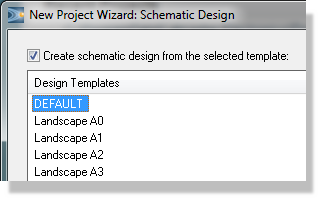
When creating a schematic check the box at the top of the screen and then select the template on which you want to base the schematic. Those provided by Labcenter basically contain different sizes of work area, although you can customise and save your own templates from within the schematic capture module.
PCB Layout
If you are creating a PCB check the box at the top of the screen and select from the available templates. PCB templates contain pre-defined board edges, mounting holes and a full set of technology data (design rules, layers in use, default units, etc.) As with schematic, you can customise and save your own templates from within the PCB layout module.
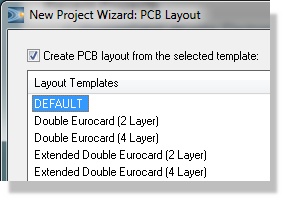
This screen will only be presented to you if you have a licence for one of the Proteus PCB design products.
Firmware
If you are creating an embedded design and want to simulate your firmware, check the create firmware box at the top of the screen and then select your controller and compiler using the combo boxes. If selected, the quick start files checkbox will generate a skeleton firmware project for you and configure project settings for compilation.
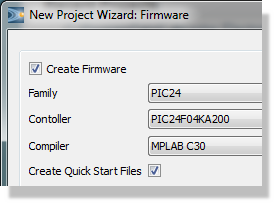
Creating a firmware project requires a schematic in order to simulate so you cannot proceed from this screen if you opted not to create a schematic earlier in the wizard.
The combo boxes on this screen are licence aware so you cannot create a firmware project for a controller than you cannot simulate in Proteus.
There is also a summary page at the end allowing you to review your setup before the wizard exits and generates the project files.
See Also:
Creating a New Project (Tutorial)
Loading an Existing Project
Loading an existing project can be done in several ways:
- By using the Open Project command once Proteus is running.
- By picking the project from the Recent Projects submenu on the File menu.
- By double clicking the file in Windows Explorer.
The Open Sample Project command, also on the File menu, opens the sample browser, from which you can load any of the worked example projects supplied with Proteus.
Importing a Legacy Project
Proteus 9 cannot import designs or layouts from v7.xx or older.
Older versions of Proteus (prior to Proteus 8) typically contained several files such as a .DSN file for schematic and a .LYT file for layout. Bringing one of these into Proteus 9 is a two stage process: you first convert the design to a Proteus 8 project, and then bring that project forward with the Migration Tool.
For the first stage you will need to contact Labcenter to obtain a copy of Proteus 8, which will be provided free of charge with a valid licence and an up-to-date USC. Or alternatively send your design files in to [email protected].
To import a legacy project using Proteus 8
The Import Wizard on the home page and File Menu is used to bring these projects into Proteus to create a .pdsprj file.
Launch the import wizard:

Browse for the old schematic (.dsn file)
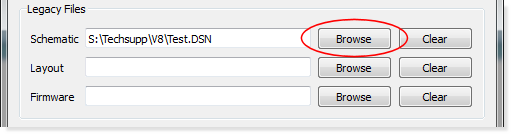
If a PCB file (.lyt file) is associated with the schematic it will automatically appear in the Layout field. If there is no layout file associated with the schematic then leave this field blank.
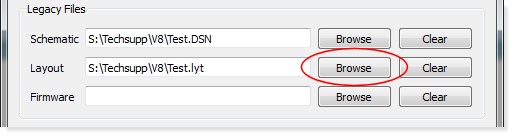
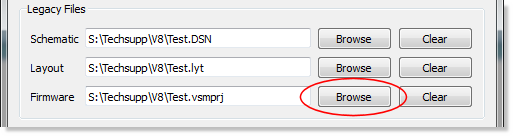
If an old VSMStudio file (.vsmp) with the same name as the schematic exists in the same directory it will automatically appear in the VSM Studio edit box. If the wrong VSMP file appears or there is no corresponding VSMP file then either browse for the file or leave blank.
The project name and path are taken from the filestem and location of the schematic being imported. You can change this if required from the fields at the bottom of the dialogue box.
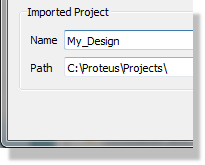
If you change the path for a VSM project then you will need to manually change the PROGRAM property of the microcontroller, otherwise your simulation will fail.
When you are finished use the import button to create a Proteus 8 project.
To bring a Proteus 8 project into Proteus 9
Open Proteus 9 and invoke the Migration Tool from the Other Tools submenu on the System menu. This is the command described as 'Import Proteus 8 data using the Migration Tool'. It converts the Proteus 8 project, together with any libraries and settings it depends on, into Proteus 9 form. A design that started life in v7 or earlier therefore travels v7 to Proteus 8 to Proteus 9; there is no single step route.
Importing Third Party ECAD Files
Designs produced in other ECAD packages are brought in with the Import ECAD Files command on the File menu, which opens the schematic and layout importer. This is a separate route from the legacy Proteus import described above and does not require Proteus 8.
Saving the Project
You can save your project at any time using the Save Project command, and you will also be offered the chance to save it when you close the project or leave the application. In each case it is saved to the same file from which it was loaded. The Save Project As command allows you to save the project to a different file.
The version of the file you are replacing is always kept. What it is called depends on how many backup levels you have configured in System Settings:
- With a single backup level, the old file stays in the project folder and is renamed Backup of <name>.pdsbak.
- With multiple backup levels, the old file is moved into a Project Backups sub-folder and given a date and time stamp, as in <name> [20260826, 14-32-05].pdsprj. Each save adds another file, so you can step back through several generations.
- In either case, if the file being replaced was written by an older release of Proteus, it is named after that release instead, as in <name> [Proteus 9.1].pdsprj. Proteus tells you the name it has used at the time it saves.
Import / Export Project Clip
The Export Project Clip command creates a project clip out of all currently tagged objects. The clip can then be read into another sheet, or another project, using the Import Project Clip command. After you have chosen the clip, operation is identical to the Block Copy function. Export Project Clip is also on the context menu for a tagged selection.
These commands have nothing to do with graphics export to DTP packages. The Export Graphics commands handle this functionality.
Quitting Proteus
To close the project you are working on but stay in Proteus, use the Close Project command on the File menu. To end the session altogether, use Exit Application, default key ALT+F4, or the cross at the top right of the application. If you have modified the project, you will be prompted as to whether you wish to save it.