PROPERTY ASSIGNMENT TOOL (PAT)
Introduction
The Property Assignment Tool is a very flexible way to change component properties on the schematic. For component properties this has now been largely superseded by the Design Explorer, which allows you to edit the schematic properties in a spreadsheet-like view. However, the PAT remains a very useful tool for applying other object properties, particularly wire labels when tapping a bus.
For a bulk edit of component properties, reach for the Design Explorer first. Its search presents the matching parts and their properties in a grid, so you can see and change every value at once. Changing the package of all the 10nF capacitors in a design, for instance, is easier as a Design Explorer search than as a tag-and-assign operation here. Come back to the PAT when you need to work on wires, pins or terminals, when you want to generate a numbered sequence, or when you want to show, hide or resize a property rather than change its value.
See Also:
Searching and Filtering in the Design Explorer
Do not use the PAT to change properties on managed library parts. It will not assign a managed property to a managed part, and it gives no message when it declines, so a run that appears to do nothing has in fact been refused. Managed parts are maintained by the librarian; see Managed Properties.
The PAT Dialogue Form
The PAT is operated from a modestly complex dialogue form with the following fields:
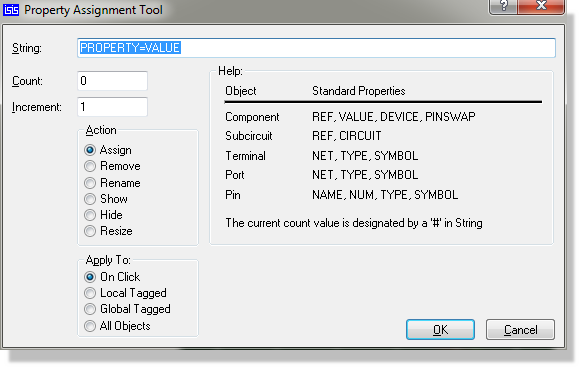
The Property Assignment Tool dialogue form
| Field | Description |
|
String |
The property assignment, or property keyword, on which the selected action will be performed for each object. The string may be up to 50 characters long, and that budget covers the keyword, the equals sign and the value together. |
|
Count |
The initial value for the counter. The current value of the counter may be included in the string by using the hash (#) character; see examples. Use two hashes if you want a literal hash in the string. |
|
Increment |
The amount added to the counter after each application of the PAT. The default is one, which gives D0, D1, D2 and so on; setting it to two gives D0, D2, D4, and a negative increment counts down. |
|
Action |
The action you wish to perform; see PAT actions. |
|
Apply To |
The application mode in which you want the PAT to operate; see PAT application modes. |
The Help panel on the right of the form is a crib sheet rather than a control. It lists the standard properties for each type of object you might apply the tool to: REF, VALUE, DEVICE and PINSWAP for a component, REF and CIRCUIT for a sub-circuit, NET, TYPE and SYMBOL for a terminal or a port, and NAME, NUM, TYPE and SYMBOL for a pin.
PAT Actions
| Action | Description |
|
Assign |
The string should contain a property definition of the form: keyword=value and this property will then be assigned to the selected objects. If you want to assign values that run in a sequence, such as D0, D1, D2, then use the hash (#) character in the value and set the initial count as required. Both user and system properties may be assigned: assigning system properties may cause graphical changes to your drawing. |
|
Remove |
The string should contain a property keyword only and this property will be removed from the selected objects. Only user properties can be removed, plus the label-backed system properties whose label can be deleted: a pin's NAME and NUM, and a wire's NET. |
|
Rename |
The string should contain a property assignment of the form: current_keyword=new_keyword The name to the left of the assignment is the existing property name you wish to rename; the name to the right is the new name of the property. Only user properties can be renamed. |
|
Show |
The string should contain a property keyword only and this property will be made visible for the selected objects. All user properties and system properties can be shown. |
|
Hide |
The string should contain a property keyword only and this property will be hidden for the selected objects. All user properties and system properties can be hidden. |
|
Resize |
The string should contain an assignment such as: REF=20,16 and the given property will be assigned a new height and width for the selected objects. The two figures are in thou. Only textual system properties may be resized. Changing a label's text size implicitly sets the height and width attributes of the label's text style to be local, so that thereafter, changes to the global text style for the label will not be reflected in these labels. |
If you give Show or Hide a string containing an equals sign, the tool assigns the property and sets its visibility in the same operation, rather than complaining. This is a convenient way to add a property and make it visible, or add it and keep it off the drawing, in a single pass.
PAT Application Modes
The selected PAT action can be applied to the design in the following ways:
| Mode | Description |
|
On Click |
On selecting the OK button, the selection mode icon is selected. Each object on which you click left has the selected action performed upon it. When you select a different icon the PAT is cancelled. This mode is the only way to apply the PAT to wires, in order to assign wire labels. Proteus cannot perform PAT assignments on tagged wires, because there would be no way for it to know where to put the wire labels. |
|
Local Tagged |
The selected action is performed on all tagged objects on the current sheet only. You can select the tagged objects either individually or with the Search and Tag command. |
|
Global Tagged |
The selected action is performed on all tagged objects across the entire design. You can select the tagged objects either individually or with the Search and Tag command. |
|
All Objects |
The selected action is performed on all the objects on the design. |
When you invoke the tool, Apply To starts on On Click, unless something on the current sheet is tagged, in which case it starts on Global Tagged.
The Search & Tag Command
The Search and Tag dialogue allows you to search within a design for components or other objects matching specified criteria. The criteria are specified by the properties of the object type you are searching for. For example, a search for all components with a value of 10k would look like the following:
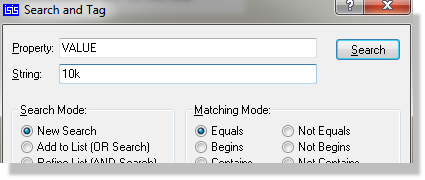
A search for all components with a value of 10k
Enter the property name and the string to look for, then press Search. The results appear in the table at the foot of the dialogue under three columns: Reference, Value and Sheet Name. You can zoom and centre the schematic on a particular object by double clicking its entry in the table.
The dialogue is closed with Done, which tags everything currently listed, or with Cancel, which leaves the tags as they were.
Matching Mode
Matching Mode decides how the string you typed is compared with the property value. Six choices are offered: Equals, Begins and Contains, each with a negative counterpart of Not Equals, Not Begins and Not Contains. Equals is the default.
The negative modes are worth a moment's thought. An object which does not carry the property at all matches a Not search, because its (absent) value is certainly not equal to what you typed. A Not Equals search for VALUE 10k therefore tags the terminals and the sub-circuits as well as the resistors that are not 10k.
Case sensitive search? decides whether the comparison respects capitals. It is off by default, so a search for bc108 finds BC108.
Search Mode
Having completed your original search you can refine or extend it by changing the search parameters and choosing one of the three Search Mode options before pressing Search again.
- New Search discards the previous results and lists only what matches the new criteria. This is the default.
- Add to List (OR Search) keeps the previous results and adds anything matching the new criteria.
- Refine List (AND Search) keeps only those of the previous results which also match the new criteria.
The Search across whole design? option decides the scope. It is on by default, which searches every sheet of the current board; clearing it restricts the search to the current sheet.
Browsing the Results
When you zoom into an object from the results table, all the search results highlight and the dialogue closes to give you an unrestricted view of the schematic. The tags survive, so to look at the next item in the set you can re-invoke the command (the default keyboard shortcut is T), press Search with the Search Mode set to Add to List (OR Search), and double click the next entry. The results table itself starts empty each time the dialogue opens and is filled only when you press Search.
Examples
The Property Assignment Tool and Search & Tag command provide great power and flexibility when it comes to manipulating object properties. However, they can seem somewhat daunting to beginners. With this in mind, some step by step examples to get you started are given below.
To label a set of bus taps:
- Invoke the PAT. The default keyboard shortcut is A.
- Set the string to NET=D# and click OK. The action will have defaulted to Assign and the mode to On Click.
- Click left on each wire where you want the wire label to appear. The cursor keys and the ENTER key can be used as an alternative to the mouse. The wires you click on will be assigned new wire labels in the sequence D0, D1, D2, and so on.
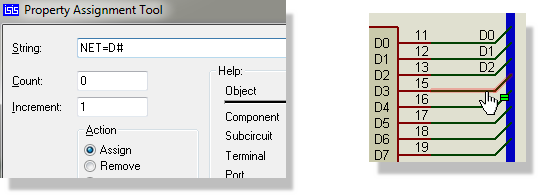
Labelling a set of bus taps with the Property Assignment Tool
To assign a package to all the BC108s in a design:
- Invoke the Search and Tag command. The default keyboard shortcut is T.
- Set the property to VALUE and the string to BC108, then click Search. The matching mode will have defaulted to Equals and the search mode to New Search. Exit the dialogue with the Done button to tag all the search results.
- Invoke the PAT.
- Set the string to PACKAGE=TO18 and click OK. The action will have defaulted to Assign and the mode to Global Tagged, assuming there were tagged BC108s. All the tagged BC108s will be given the new user property.
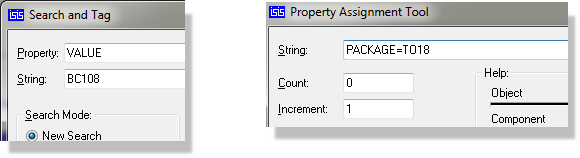
Tagging the BC108s and then assigning a package to them
To rename all ITEM properties to CODE properties:
- Invoke the PAT.
- Set the string to ITEM=CODE, the action to Rename and the mode to All Objects, then click OK. Every object with a property ITEM=value now has a property CODE=value instead, and the values are untouched.
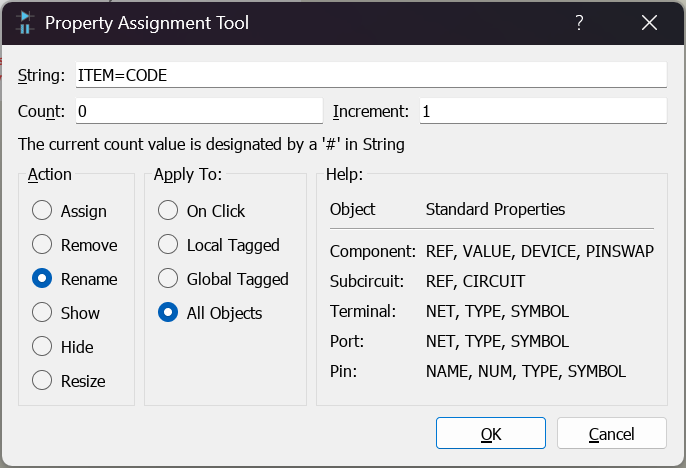
Renaming properties globally with the Property Assignment Tool
To hide all package properties:
- Invoke the PAT.
- Set the string to PACKAGE, the action to Hide and the mode to All Objects, then click OK. All the PACKAGE properties will be hidden.
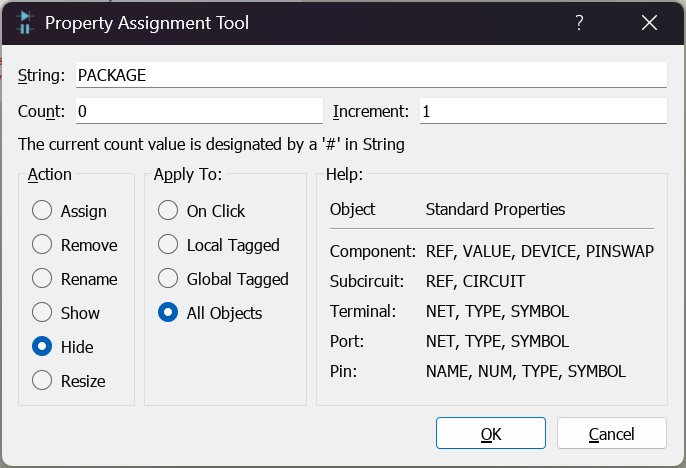
Hiding package properties globally with the Property Assignment Tool
To resize the component references:
- Invoke the PAT.
- Set the string to REF=10,8, the action to Resize, and the mode to All Objects, then click OK. All the component references will be shrunk to the new size.
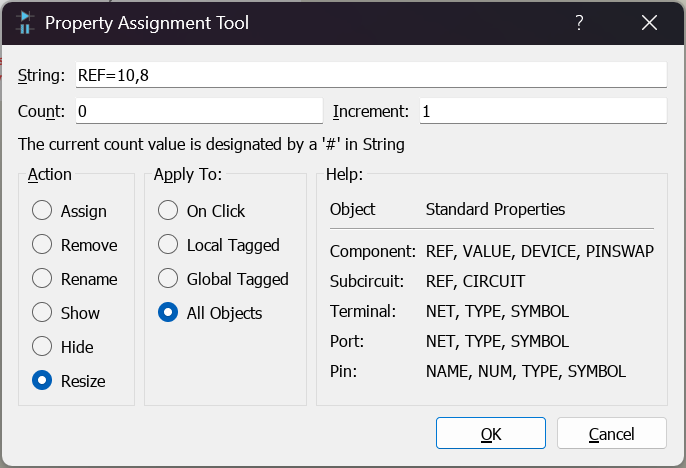
Resizing component references globally with the Property Assignment Tool
To assign larger packages to 1000uF capacitors:
- Invoke the Search and Tag command. The default keyboard shortcut is T.
- Set the property to DEVICE and the string to CAP-ELEC, then click Search. This will display all the electrolytic capacitors in the results table at the foot of the dialogue.
- Change the search mode to Refine List (AND Search).
- Set the property to VALUE, the string to 1000u, and the matching mode to Begins, then click Search. This will narrow the list to those capacitors whose value begins 1000u, so 1000u and 1000uF are both found. Exit the dialogue with the Done button to tag them.
- Invoke the PAT.
- Set the string to PACKAGE=ELEC-RAD30 and click OK. The action will have defaulted to Assign and the mode to Global Tagged, assuming there were tagged capacitors. All the tagged capacitors will be given the new package.
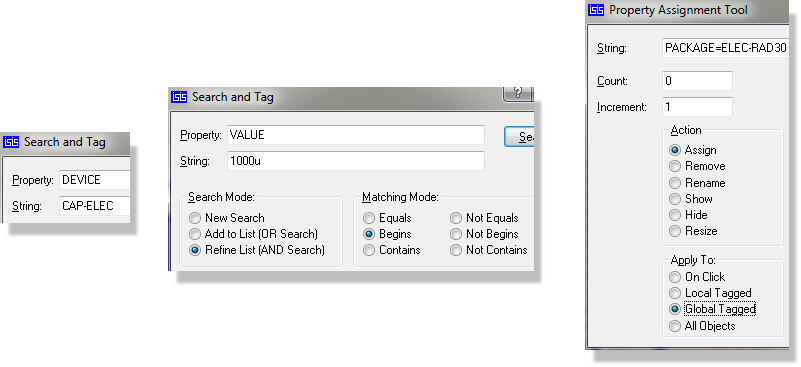
Refining a search across two properties and then assigning a package to the result