MQTT BASICS
Introduction
This introductory tutorial covers the basics of publishing messages from the appliance to the broker and then subscribing to a topic which has messages published to it. To keep things as simple as possible we will be working with a single appliance and will view published messages directly via the MQTT broker. We are therefore going to assume that before you start this tutorial you have installed the mosquitto broker on your computer.
See Also:
Our appliance will consist of Arduino Uno and ESP8266 so let's start with the New Project Wizard on the home page. On the firmware screen create the project with an Arduino Uno target and the Visual Designer compiler.
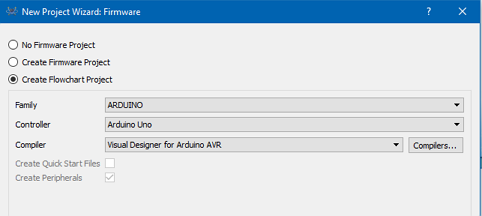
Set up the project with Arduino Uno controller and the Visual Designer Compiler.
Continue on through the wizard until completion. When you are finished you should see that you have a blank flowchart in the Visual Designer tab and a schematic with the Arduino Uno pre-placed.
Hardware Configuration
In order for the Arduino to publish messages it needs to be connected to a wireless device. We'll use the ESP8266. To add the ESP8266 to the project first make sure that you are on the Visual Designer tab. Next, right click on the Arduino Uno entry in the project tree and select the Add Peripheral command. Navigate to the Internet of Things category, select the ESP8266 VFP server and click Add to insert it into the project.
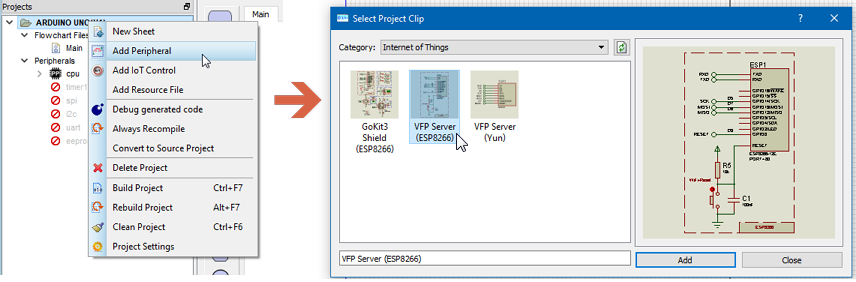
Adding the ESP8266 peripheral into the project.
You'll notice that after adding the ESP8266 peripheral we have extra options in the peripherals project tree. The MQTT functionality is disabled by default to save on Arduino program memory space when it is not in use but we can enable it from the right click context menu.
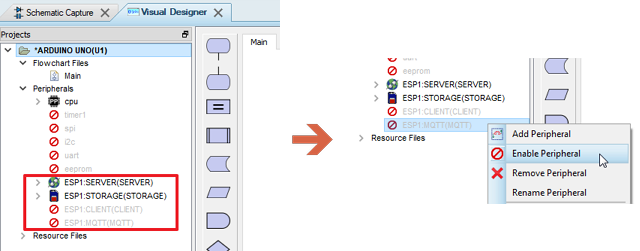
Enabling MQTT after adding the ESP8266 Peripheral.
We also need to specify the location of the broker. Double click on the MQTT peripheral entry to open the property panel underneath. Assuming we've installed mosquitto on the same machine we can leave the defaults are localhost. If the mosquitto broker is on another machine you'll need to set the IP address of the machine here. Similarly, port 1883 is the default for mosquitto so you don't need to change it here unless you've made changes to the mosquitto config.
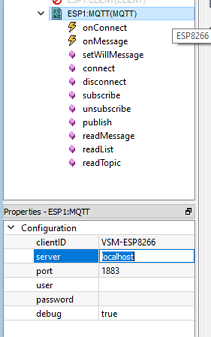
Double click to get the property pane and then set the server and port.
Publishing
Let's turn our attention to the firmware and publish a message to the broker. To keep things as simple as possible we'll do everything in the setup routine and we'll send only one message. Start by dragging across the connect method from the MQTT section of the project tree and drop it inside the setup routine. Once that's in place drag the publish method directly underneath it and right click to edit.
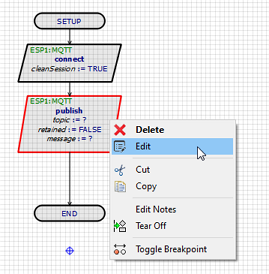
Editing the Publish Method
We need to setup a topic that we are going to publish to and then enter the message that we are going to send. Since we are sending only one message in the Setup routine we need to set the message to be retained so that the broker will store it.
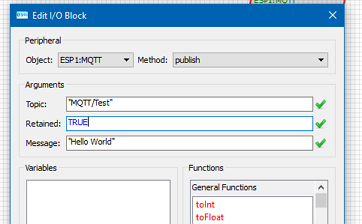
We're going to send a Hello World message to the MQTT/Test topic
Finally, we need to close the connection by dragging the disconnect method to the bottom of the setup routine. Our final firmware flowchart looks like the screenshot below.
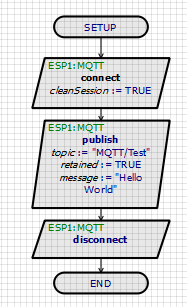
This is how easy it is to publish an MQTT message in Visual Designer !
Simulation (Publish)
Before we run the simulation we need to run the mosquitto broker. This process is described in detail in the broker setup topic but basically you start a command prompt, navigate to the mosquitto directory and then start the session with logging using the following command:
mosquitto -v -c mosquitto.conf
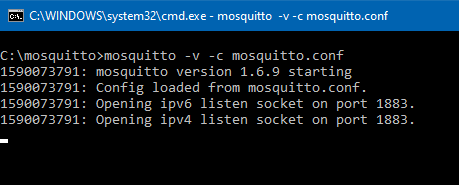
Console broker is running.
The -v flag enables logging while the -c flag tells the broker to run the session using configuration from the mosquitto.conf file.
Now the broker is running we can go ahead and run the simulation. You should see that the broker logs the connection being established, the topic being published to and then the session being disconnected.
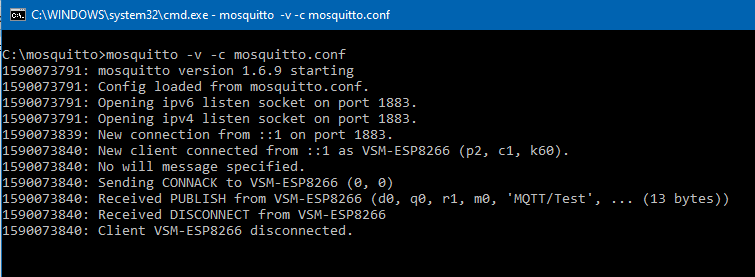
Session activity shown by the logging on the mosquitto console.
So far, so good. However, to be sure everything is working we need to subscribe to the topic so that we can get the message itself and confirm that transmission was successful. We can do this with a separate command prompt. Launch the command prompt from the Start menu (type cmd in the search bar). Navigate to the mosquitto directory using the cd command and then subscribe to the topic as shown below.
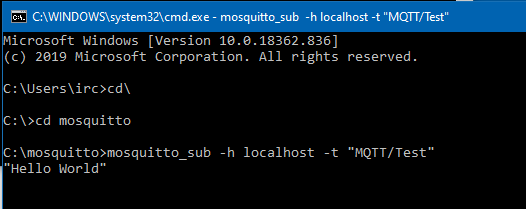
Subscribing to the topic and receiving the message.
You should also notice at this point that the console broker session has updated to reflect the subscription.
Now, let's leave both command prompts running but stop the simulation and make some changes to our program. Specifically, we'll move the entire program into the loop routine so it is constantly executed. We'll need to add a delay so that we don't hammer the broker with messages and we definitely want to change the message so that it not retained. Our new test program therefore looks like the one below:
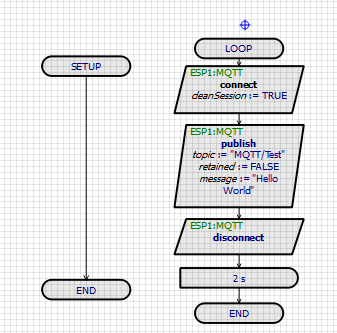
Constantly publishing messages to the broker.
Press the play button again and we can see continuous activity on both the console monitor which is logging the broker activity and also on our command prompt which is subscribed to the topic.
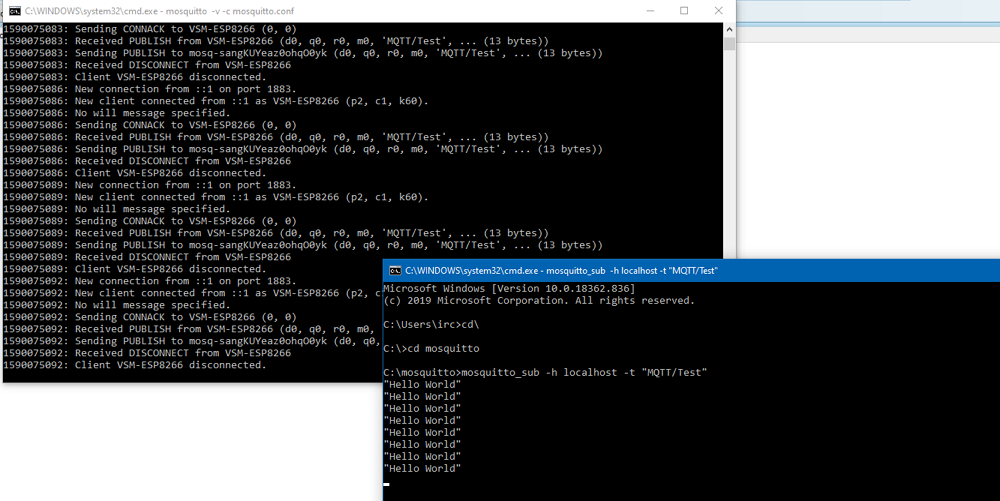
Broker activity on console and command prompt subscribed to the topic.
When you are finished we can stop the simulation. We'll leave both command prompts open as we'll use the broker again when subscribing to a topic in the following section of the tutorial.
Subscribing
To subscribe to a topic we need to re-write our firmware program so let's return to the visual designer flowchart module and delete the current program blocks
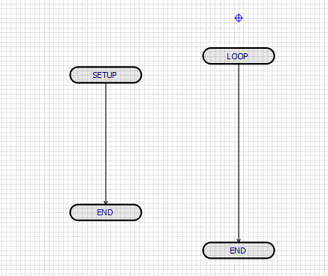
Skeleton Flowchart ready for us to program our Subscribe logic.
Connect
The first step is to establish the connection. We can do this in the SETUP routine as library code within the MQTT peripheral will automatically re-connect if the connection to the broker is lost. Drag and drop the connect method from the MQTT peripheral in the project tree into the setup routine.
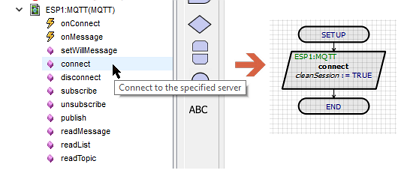
Establish a connection in the setup routine.
We know where the broker is in order to establish a connection to it because we specified the location in the MQTT properties pane. Double click on the MQTT peripheral in the project tree to see or edit the properties.
Next, we want to make use of the two event handlers available under the MQTT peripheral. These are called onConnect and onMessage and are shown with a little lightning bolt icon beside them in the project tree. An event handler is a routine in our program that is called when a condition is true. For MQTT event handlers:
- onConnect is called whenever a connection is established.
- onMessage gets called whenever the client receives a message (from a topic the client is subscribed to), which has been forwarded by the broker.
Subscribe
We want to subscribe to topics inside the onConnect event handler. Since we've started a session in the setup routine this will be called for the current session. It will also be called if we ever temporarily lose the connection and then need to re-connect.
Drag and drop the onConnect event handler and then place a subscribe method block inside the event handler.
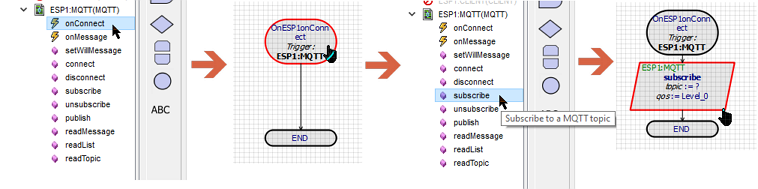
We want to subscribe to topics inside the onConnect function.
Next, we want to edit the subscribe method and specify the topic that we want to receive messages.
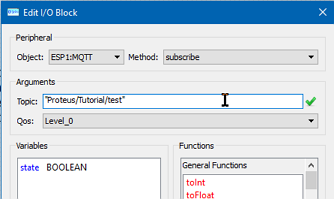
Subscribe to the "Proteus/Tutorial/test" topic.
Remember the double quotes (" ") around the topic text.
We need to leave the quality of service (Qos) parameter at level 0 as this is the only level currently supported by the Arduino stack.
Messages
Finally, we need to decide what to do when a message arrives on a topic that we are subscribed to. We start by placing an onMessage event handler as this is how we'll know that we have a message. Drag and drop the event handler in the usual way onto the flowchart
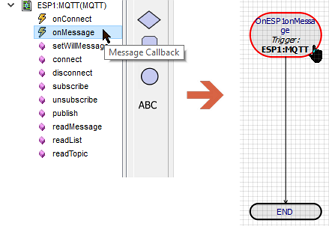
onMessage Event Handler
In an application we may be subscribed to multiple topics so our first job inside the onMessage event handler is to work out which topic the message has come from. The easiest way to do this is to make use of the MQTT sensor function. Drag and drop from the MQTT peripheral itself and you'll see that we get a decision block. Edit the block and enter the topic name. This allows us to gate any message specific logic depending on whether the message belongs to the named topic.
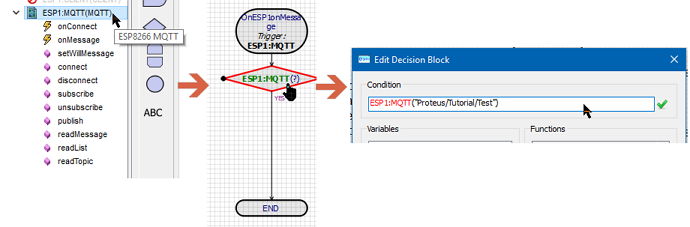
Set up a sensor function to gate messages on the named topic.
At this point it's good practise to draw a wire from the decision to the bottom of the routine to handle those messages not of the topic we're interested in at the moment.
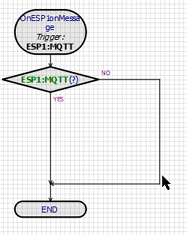
Now, there are two ways in which we can retrieve information from a message, namely:
- readMessage: Retrieves the message as a string into the variable mqttMessage.
- readList: Splits the incoming message at every comma and reads each item into a variable.
readList is really versatile and powerful but you need to know exactly the format of the incoming message. For example, in a sensor report you might have Temp, 190, time, 12:00, humidity, 12.5 and you'd therefore need corresponding variables of type String, int, string, time, string, float, It's also a more dangerous method to parse the message. Having the wrong variable types in your comma separated list is an excellent way to crash your program !!
Let's look at a really simple example. We'll assume our incoming messages contain either a 0 or a 1 and that we will turn the onboard LED either off or on depending on the message contents. This is going to be much easier to manage if we treat the incoming message data as boolean which means that we need to use readList instead of readMessage.
Drag and drop the readList method inside the decision gate and then edit the block. We need to create an ledState variable of type boolean and then set that as the variable to receive the incoming message data.
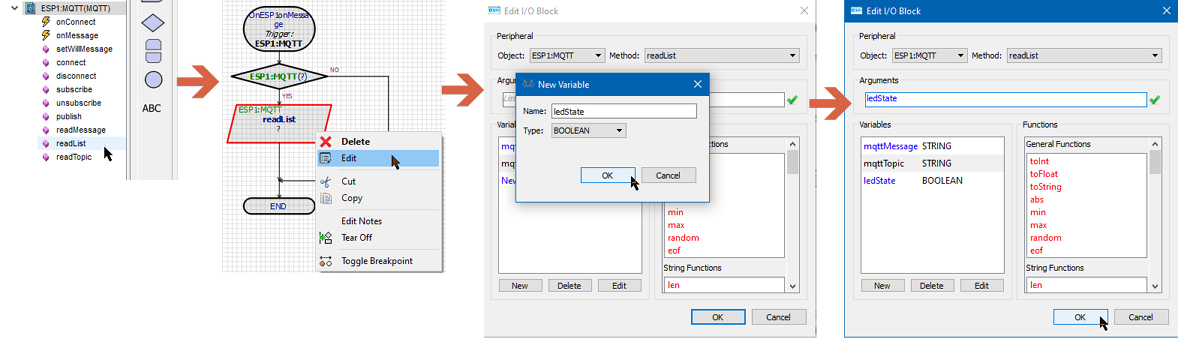
Read the message data into a new boolean variable.
Once we've read in the data we decide what to do with it. In this case, turn the onboard LED either on or off. To do this, expand the CPU section of the project tree and then drag the setBuiltInLED method into place. Then edit the block and set the value to be our variable.
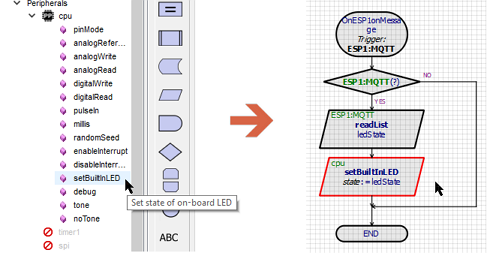
Turn the built in LED on or off depending on the value read from the message.
That's our program ready to go. Your Visual Designer sheet should look something like the following :
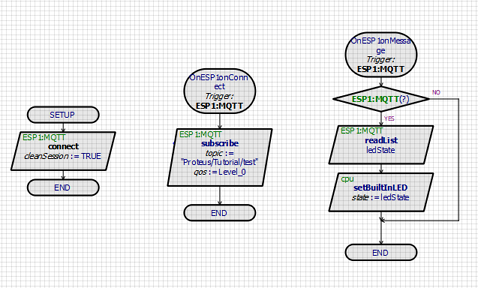
Complete program to subscribe to a topic and turn on/off the LED based on the incoming message data.
Simulation (Subscribe)
Before we run the simulation double check that we have our two command prompt windows up and running. One is running the MQTT broker and the second is running an MQTT console program. If they have been closed down the procedure for launching them is described earlier in the tutorial document.
Now press play to run the simulation and you'll notice the connection being established on the broker log.
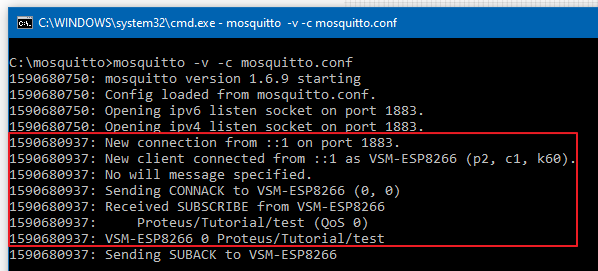
Broker command prompt logs activity including the connection and topic subscription from our simulation.
Switch to the MQTT console and let's publish a message to the topic. Type :
mosquitto_pub -h localhost -t "Proteus/Tutorial/test" -m "1"
The flags we've used are:
- -h : host location (localhost or IP address).
- -t : topic name
- -m: message
Remember that strings will be case sensitive !
If everything is working as we'd expect you should see activity on the broker console logging that the message had been published and then the broker sending the message onwards to our client which is subscribed to the topic. Finally, since we sent a "1" you should see the on-board LED in simulation turn on.
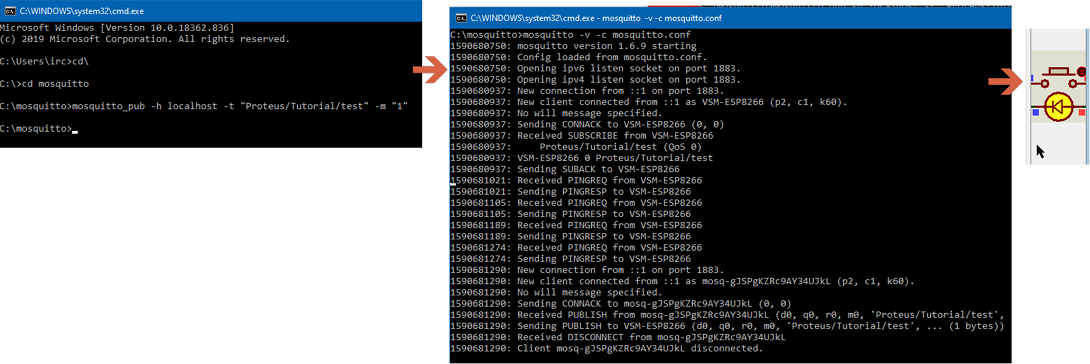
Publishing the message is logged on the mosquitto broker and we turn on the in-built LED
Try sending another message with the message as "0" to turn the LED off.
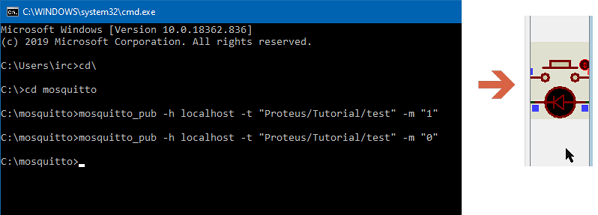
Send a different message to turn the LED back off.
When you are finished stop the simulation and we can close the two command prompts as well. This will shut down the Mosquitto broker and also close our little console app.
Summary
This introductory tutorial was intended to show the basics of how to publish messages and how to subscribe to messages inside a Visual Designer project. We've deliberately avoided using multiple appliances to focus on the basics of using the protocol and have therefore used a command line broker app on the other side of the message.
In a large number of use cases there will of course be more than one appliance. In Proteus, you might typically have a Raspberry Pi controller appliance and one or more Arduino sensor appliances. The next MQTT tutorial covers how to work with multiple appliances in more detail.