MOSQUITTO BROKER SETUP
Mosquitto Broker on PC
Before we get started with a project in Proteus we need to organise the broker. We will be using the popular Mosquitto broker. As discussed, the broker software can be installed anywhere, so long as the IoT system can see it and communicate with it. Practically speaking, there are three common configurations which we'll cover:
- Broker on PC
- Third party website broker.
- Broker on Raspberry Pi
Broker on PC is the easiest to get started with and is described in this topic.
To start simply visit: https://mosquitto.org/download/
Install whichever version fits your windows machine. Since we will be changing the configuration file we recommend you change the installation directory out of Program Files which Windows does not like to include writable files.
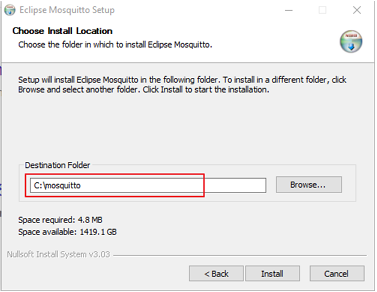
Install to a writable directory.
If you choose to install in the default location (Program Files\mosquitto\) you will need to organise write access to the directory in order to change the config file as discussed below. Tools like Notepad ++ can open files as Admin or you may launch from an administrative command prompt.
Next, we recommend that you uncheck the mosquitto service installation before completing the install.
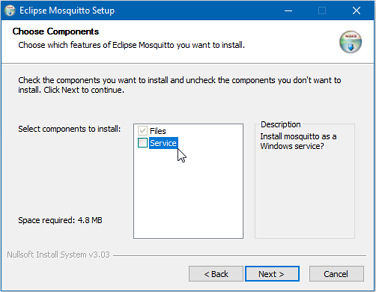
Do not install the service unless you are confident in your system configuration.
Mosquitto can be run from the console with debugging / logging which is much more useful during system development. Since you cannot have two mosquitto brokers listening on the same port it will also become confusing to have a service broker running as well as console broker. Additionally, the service broker is not suited to servicing multiple Proteus simulation clients because simulation client ID's are not randomised and the broker cannot handle multiple clients with the same ID. Using local console brokers therefore is almost always the better option.
Configuration File
Before we run the Mosquitto service there is one particular configuration change that we recommend.
1) Open up the configuration file in your favourite text editor: C:\Program Files\mosquitto\mosquitto.conf
2) Add the following text on a new line within the file: queue_qos0_messages true
QoS 0 messages aren't stored by the broker by default. This setting allows them to be stored which is essential to avoid message being lost in multiple appliance systems. For example, if a subscriber appliance is asleep when a message is published and there is no storage of the message it will be lost. It's important for us to set this in the config file because the Arduino stack only supports the sending of QoS level 0 messages.
Running the Broker
There are two options for running the broker. You can run the service or you can start a process from the command line. If you run from the command line via the procedure below you will get useful logging information during your testing session and the broker will close when you close the command prompt. If you run the service no logging is available and the broker will continue running until the service is stopped.
Broker from Command Prompt (Recommended)
Open up a command prompt on the PC, navigate to the mosquitto directory and launch the broker on your machine.
1) Start Menu -> Run -> cmd
2) Navigate to installation directory using the cd command.
3) Type mosquitto -v -c mosqitto.conf and it will start a broker on your machine
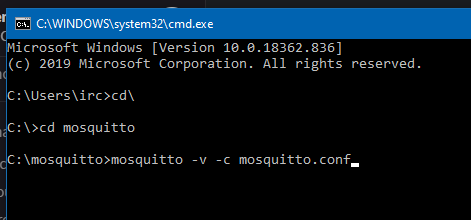
Starting a console broker session.
The -v parameter enables logging to the command prompt. In particular, it will tell you which port the broker is listening on.
You may well need to allow mosquitto to pass through the Windows firewall if you get prompted to do so.
Note that closing the command prompt will close the broker and so it should be left open for the session.
Broker Service (Advanced Use - No Debug)
1) Right click on the program bar at the bottom of Windows and select task manager from the resulting context menu.
2) Select the services tab and then scroll to the mosquitto service. Right click on the service and select start.
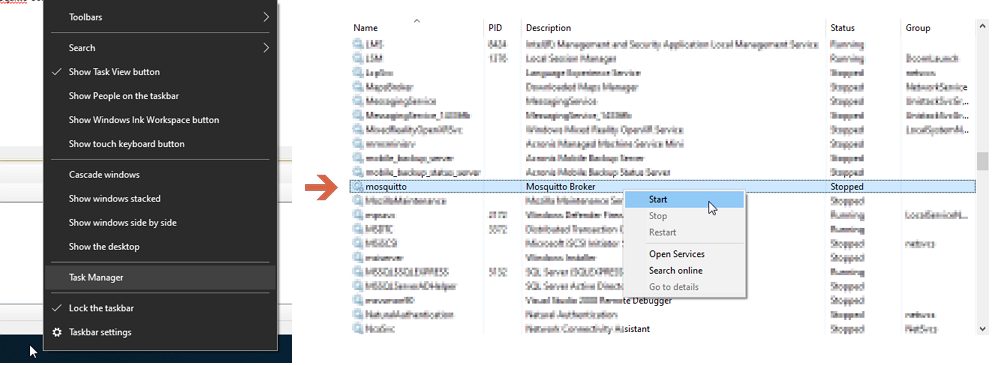
You can also use 'net start mosquitto' and 'net stop mosquitto' from the command prompt.
If this doesn't work it's most likely because something else is sitting on port 1883 which the mosquitto service listens on by default. The mosquitto service listens on port 1883 by default but you can change in the config file using the port command.

Changing the port in the config file.
IP Address
If you are running Proteus on the same machine as the mosquitto broker you won’t need the IP address. In this case we'll simply use the default “LocalHost”.
If you are running the broker and Proteus on separate machines, you can get the address by using the ipconfig command on the machine running the broker and look for the “IPv4 Address”. This address will be the broker address.

Retrieving the IP address of the broker machine (necessary only when it is not the same as the machine running the Proteus simulation!)
If you are plugged in to the router via an ethernet cable, then scroll down the list until your reach the 'Ethernet adapter Ethernet' section. Otherwise find your Wireless Adapter section.
Troubleshooting
Almost all of the problems with setting up the broker will be related to whether a broker is actually running, what port it is on and if it is a service or a console.
Multiple brokers
Since you can change port numbers it's possible to have multiple brokers in play at any time so the first step will be to establish what is going on.
Use the tasklist command at the command prompt as shown below. Note that it not only lists the brokers running but will tell you whether they are service or console based. In my example I have both a service broker and a console broker running. Not at all clever but set up this way for illustration.

Use the tasklist command to establish what brokers are running on the PC.
To sort out this situation you need to decide whether you want a broker to always be available or whether you want the broker to be available for a session. In the former case you want to keep the service and close the command prompt and in the latter case you want to stop the service and keep the command prompt open.
Multiple brokers on one PC are not recommended as they are likely to cause confusion.
Port Number Conflicts
Another common set of problems is with port numbers. If you get errors at the command prompt or services refusing to start it normally means that something else (usually another broker instance !) is sitting on the port.

Command prompt error when launching a broker and there is a port conflict.
1) Use tasklist as above to make sure you haven't got another broker running. If you do, we'd recommend you close it as running more than broker is going to be confusing unless you are an expert at this type of thing.
2) If another program is using the port (1883 by default) you can change the port used by the broker in the config file.
Accessing the broker from another device
If you are running Proteus on the same PC as the broker then everything will be nice and simple for simulation as you can just use localhost to address the broker. If you are accessing the broker from another device you'll need both IP address and port number.
- The port number will be listed on the command prompt if it's a console broker session.
- The port number will be in the config file it it's running as a service. If there is no mention in the config file then the port number is 1883.
Third Party Website Broker
Here we will use a third party website that has Mosquitto installed as the server. There are a few of these but the one we have chosen is test.mosquitto.org.
With a website broker of course no installation or setup is required. All we have to do in our project is specify the broker location in the MQTT peripheral properties. To do this, we would
1) Make sure the MQTT peripheral is enabled and then double click on it to launch the property panel.
2) Set a unique client ID.
3) Specify the URL and port number of the web broker.
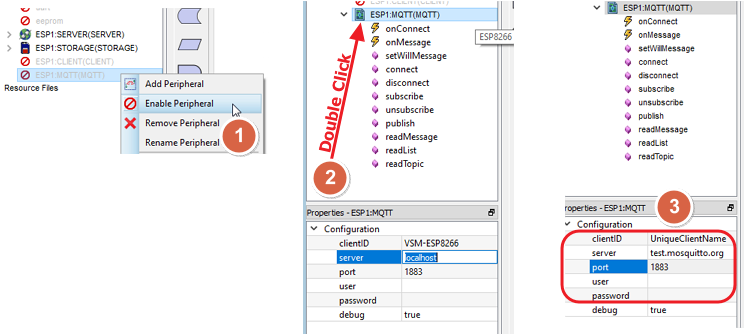
We need to tell Proteus where the broker is and how
This can be a fast way to get setup and working and it is particularly useful where two appliances are remote from each other. However, during development especially there are some significant drawbacks:
- No debug. One of the benefits of running a copy of the broker on your PC is that you can launch the broker with debug to the console and see all communications.
- Unique Client ID's. If you are in a classroom environment for example you must make sure each client has a unique client ID for the broker. This isn't a problem when the broker exists on each machine locally but is an issue with a website broker. If you have multiple devices with the same name, every time the new device with that name connects to the broker it will kick the old device with that name off. This can cause issues like loops as the old device attempts to reconnect. If you are planning to use multiple devices with one broker it is essential that each device has a unique clientID. The clientID can be set as a design time configuration property (as shown above) or at run time via a dedicated method call.
- You can't configure the broker. Unlike with the PC configuration the free web broker is set to default configuration. This means QoS 0 messages are not queued and QoS 1 and 2 are. Be aware that this could be a serious problem for Arduino appliances if they can only send QoS 0 messages. It also means that you can't supply credentials to the broker and then log in from the clients.
- Topics are shared across the entire broker user base. Not only is there no privacy at all but perhaps more significantly common topic names may have rogue messages published to them or be shared outside your intended user base.
- The free mosquitto broker is used for debugging and development of Mosquitto itself. This means it may be very slow (if they are debugging) or even suffer from instability and downtime (if they are beta testing).
For these reasons we've opted for installing the broker on a local machine as the preferred development setup and used that in our MQTT Basics Tutorial.
Broker on Raspberry Pi
Here we will use a raspberry PI as the server. To configure the Mosquitto software on a Raspberry Pi:
1) Install the broker using this command:
sudo apt install mosquitto mosquitto-clients
2) Check to make sure the broker installed correctly
sudo systemctl status mosquitto
Result:
active (running)
3) To connect, use the command ifconfig to identify the IP address of the RPi. You can use localhost when connecting from the RPi but you will need the IP when connecting from an external device.