LIBRARY OVERVIEW
Introduction
As supplied there are 2 symbol libraries (which are shared with the Capture Module):
- SYSTEM.LIB
- USERSYM.LIB
and many package libraries including:
- PACKAGE.LIB
- CONNECTORS.LIB
- SMTCHIP.LIB
- SMTDISC.LIB
- SMTBGA.LIB
- USERPKG.LIB
You can, of course, create further libraries of your own using the Library Manager. Parts themselves can be created from scratch in Proteus or, more commonly, imported from one of our supported web vendors. The import process is wholly automatic and starts from the standard Library part pick form in the schematic module (normally, schematic part, associated footprint and 3D STEP model are all imported).
Library Discipline
The LIBRARY directory as installed with Proteus contains two symbol libraries and over 140 device libraries as well as various essential utility files. The following extensions are used :
- Library Files (.LIB)
- Index Files (.IDX)
- 3D Model Files (.VML or .3DS)
- Master Style File (.STY)
- Managed Property Definitions (.ADI)
- Configuration Files (.INI).
Index files are not shipped by the installer. Proteus builds them in the library directory the first time it needs them, which is one of the reasons that directory has to be writable. The managed property definition file, REALPCB.ADI, defines the property set used by managed libraries and is documented in the Library Manager help file.
The path to the LIBRARY directory is set by the installer to the users ProgramData branch. You can change or add another library path from inside the Proteus application (System Menu - System Settings command).
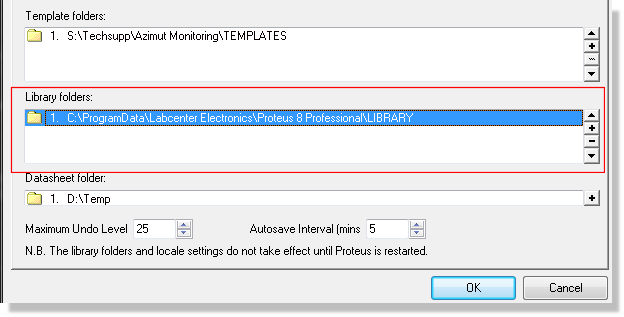
System Settings showing the Library section
If you are working with managed libraries you will most likely have multiple paths here, one of which you set to point at the compiled managed libs that have been provided to you.

Library paths configured for managed working, with one path pointing at the compiled managed libraries
We would recommend that you not move your LIBRARY directory (or add another one) unless you need to and that before making any changes you read the following potential issues and requirements carefully :
- Three libraries, namely USERDVC.LIB, USERPKG.LIB and USERSYM.LIB are installed read/write and intended for users to create their own components, footprints and symbols. You can create additional libraries if need be through library manager. All other installed libraries are installed as read only and contain Labcenter supplied library parts. If you make Labcenter Libraries writable then you will lose changes to those libraries when you update your software. Labcenter libraries are overwritten by the installer to allow to continue to add support for new parts.
- If you move your library folder onto a network then it is vital that the directory is fully read/write to all users. If Proteus cannot write the library directory it simply will not work.
- If you elect to have more than one library folder (e.g. one local and one network) then they must be completely de-duped. Two libraries or files with the same name in different places will at best result in confusion as nobody will know which one was loaded.
- Under no circumstances should you remove items from SYSTEM.LIB.
The Library Browser
To open the Library Browser, click the Pick from Libraries button at the top of the Object Selector, press P on the keyboard, or use the Pick Parts command on the Library menu. The form itself is titled Pick Packages. Each part in the package libraries is assigned a Category, a Type, a Sub-Category and a textual Description. This information is displayed by the Library Browser and makes it very easy to search the libraries for the parts you require.
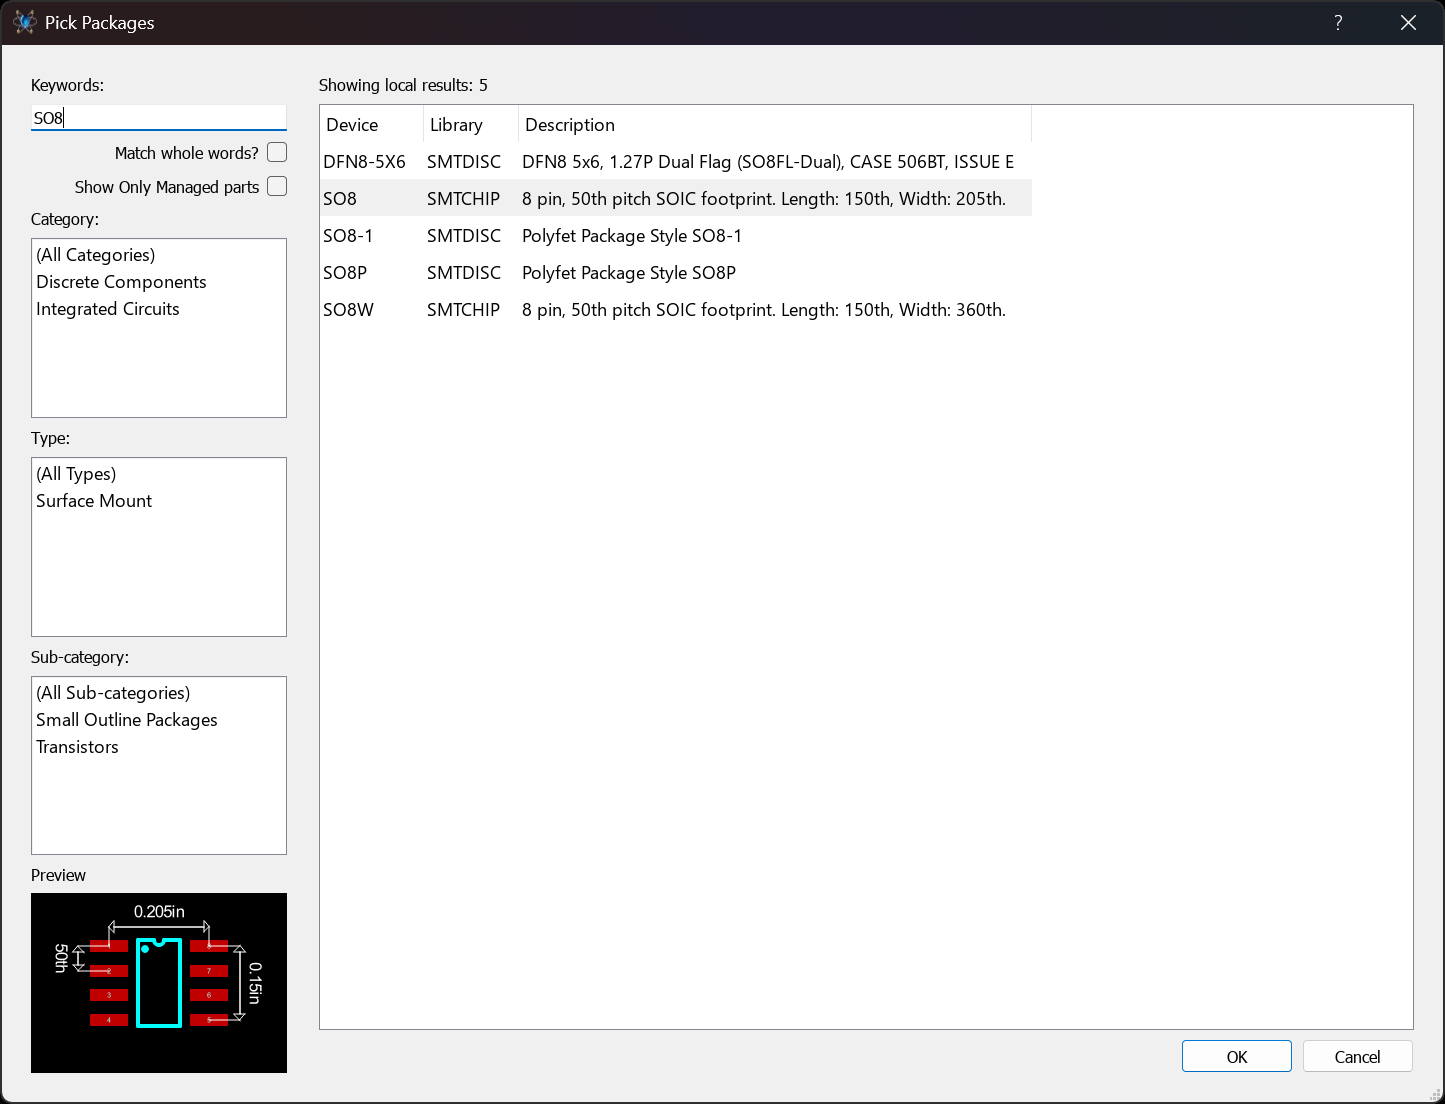
The Library Browser, which appears as the Pick Packages form
To search the libraries for a part using keywords
- Enter keywords that describe the part into the Keywords field. The search operates by matching the keywords against the parts’ names, descriptions, categories and sub-categories.
If you enter several keywords, they must all be matched against a part for that part to show in the results. In other words, it is implicitly an AND search. Unless you check the Match Whole Words checkbox, then partial matches are allowed, so ‘DIL’ will match ‘DIL08’ and so on. - If the keyword(s) result in a lot of matches, for example ‘capacitor’ will match many parts in the libraries, you can use the Category, Type and Sub-Category fields to refine the search.
- Pick the part(s) you require by double clicking them in the Results list.
To browse the libraries for a part by category and sub-category
- Ensure that the Keywords field is empty.
- Select the Category and (optionally) Type of the part you are looking for. This will cause the Sub-Category list to show options appropriate for the chosen category.
- Select a sub-category to refine the search further.
- If you still have a large number of results, you can type a keyword into the Keywords field in order to further refine your search
If you are working with managed libraries the Show Only Managed parts checkbox is ticked by default, so the result set is limited to parts from the compiled managed libraries that have been provided to you. Web import from our part vendors is also disabled while the checkbox is ticked. You can untick it to see all the installed libraries, but be aware that doing so introduces unmanaged parts into the design.
If you can't find the footprint you want in the installed libraries the fastest solution is to use the library browser in the schematic capture module to import a part that uses the footprint you want. The schematic library browser includes an integrated web search returning over 15 million parts along with their associated footprints and - in most cases - 3D Step files.
Libraries from earlier versions of Proteus
Existing user package libraries from versions of Proteus prior to 6.6 will not contain category and sub-category information. Parts from these libraries will appear under the Unspecified category, and the library names will be used for the sub-categories.
Information on how to index your own libraries is provided in the Schematic help documentation
Updating the Layout from the Libraries
If you pick a package or symbol that is already loaded into the layout, Proteus will update it from the libraries on disk. You can also update a single package or symbol without going through the browser by selecting it in the Object Selector and clicking the Update button at the top of the selector.
Note also:
- Where packages are concerned, you should be aware that the layout module simply aligns the new part on the old part’s origin. This means that the pads may well end up in different positions and some manual re-tracking of the board will be required.
- Where a there are two or more packages or symbols with the same name spread across several libraries, the Pick command will load the newest one. This is particularly helpful if you have changed one of our parts and put in USERPKG.LIB, since your version will be deemed newer than ours.
While generally speaking package update works seamlessly, be aware that in some situations a sensible results is simply not possible. For example, if you remake a part with fewer pins then an overlay replace is not feasible. You should always visually inspect the layout after updating footprints.
Manage Changes
Picking and updating one part at a time is fine for the odd correction, but it is no way to audit a finished board. The Manage Changes command on the Library menu compares every package on the layout against the version currently held in the package libraries and presents the differences as a list. You choose which parts to accept, and only the accepted ones are replaced on the layout. Nothing changes until you accept it, so the command is safe to run purely as a check.
This is the review tool for managed libraries, where the question is whether the board is built from the latest approved versions of the managed parts, but it is just as useful on an unmanaged design after somebody has revised a footprint in USERPKG.LIB.
Update 3D Models
The Update 3D Models command on the Library menu refreshes the 3D data rather than the footprints. It walks the components on the layout and imports or re-imports the 3D mechanical (STEP) and 3D visual models held against their packages in the libraries. Use it when 3D models have been added to library parts that were placed before the models existed, or when the models themselves have been revised.
See Also:
Manage Changes (Library Manager Help File)
The Tidy Command
The Tidy Layout command on the Edit menu performs a global clean up of both the layout and the selectors. It asks you to confirm before it does anything, because several of the things it removes cannot be recovered other than by abandoning your changes.
Tidy Layout will:
- Remove all packages and symbols from the selectors that are not actually in use on the layout. This saves memory and also simplifies picking the ones you are actually using.
- Remove any component that is neither placed on the board nor referenced by the netlist.
- Delete any net class that no net and no design rule refers to.
- Delete every object that lies wholly outside the work area.
- Remove vias that are buried inside through hole pads, vias that fall outside the work area or that carry an invalid layer set, and redundant intermediate nodes on tracks.
The last three of these delete design data. In particular, if you have parked graphics, notes or spare parts outside the work area they will be deleted, and an unused net class that you created as a placeholder for a future netlist will be deleted with them. Move anything you want to keep inside the work area before running the command.
If all you want is to clear the unused entries out of the Object Selector, use the Tidy button at the top of the selector instead. That acts on the selector only and leaves the layout alone.