COMPILERS
Overview
One of the most important features in VSM Studio is the automatic detection and configuration of supported compilers to ensure that they work correctly with the Proteus VSM simulation software. This means that for the typical project, all the user needs to know is that a supported compiler is installed.
Supported Compilers
The following is the current list of supported toolchains, and it mirrors the entries you will find in the Compilers dialogue. Please see the Compiler Detection section below for instructions on scanning and downloading. While a relatively small subset of the compilers on the market at present we have focused on providing support for at least one free toolchain per supported family and then including a few other popular compilers.
We do plan to extend the list of supported compilers over time and welcome suggestions ([email protected]). In order to add support for a compiler it must be able to produce a standard debug format and we must be able to test the product with Proteus to ensure compatibility. Additionally, support for a given compiler will depend on its popularity and demand from users.
Every entry falls into one of three kinds. A toolchain whose name ends in (Proteus) is included with Proteus and is ready to use with no download at all. Others are fetched and installed for you from the Compilers dialogue using a Download button. The remainder are installed from the vendor's own website, and the dialogue offers a Goto Website button instead.
Arduino
- Arduino CLI (Proteus), included with Proteus and covering every supported Arduino board. See the Arduino Toolchains section below.
PIC
- MPLAB XC8, covering PIC10, PIC12, PIC16 and PIC18, and also the ATtiny 0-series parts.
- MPLAB XC16, covering PIC24, dsPIC30 and dsPIC33.
- MPASM (Proteus), the PIC assembler included with Proteus.
- MPASM (MPLAB), the same assembler as installed by MPLAB.
- CCS for PIC, covering PIC10 through to PIC24 and dsPIC33.
- SourceBoost, covering PIC12, PIC16 and PIC18.
Two MPASM entries are listed. MPASM (Proteus) is the assembler installed with the Proteus software and is the one the tutorials use; MPASM (MPLAB) is the copy installed by MPLAB, for users who would rather point VSM Studio at their own installation.
AVR
- AVRASM (Proteus), the AVR assembler included with Proteus.
- MPLAB XC8 AVR, the AVR release of MPLAB XC8.
- BASCOM-AVR, a BASIC compiler for the AVR family.
8051
- ASEM-51 (Proteus), the 8051 assembler included with Proteus.
- SDCC for 8051, an open source C compiler.
- Keil for 8051.
- IAR for 8051 (C).
- IAR for 8051 (Assembler).
The two IAR entries share a base name and are condensed into a single IAR for 8051 row in the Compilers dialogue. You choose between the C compiler and the assembler when you create the project.
ARM
- GCC for ARM, covering ARM7 and the Cortex-M0, Cortex-M0+, Cortex-M3 and Cortex-M4 cores.
- Keil for ARM, covering ARM7 and Cortex-M3.
- IAR for ARM, covering ARM7 and Cortex-M3.
Texas Instruments
- GCC for MSP430.
- CodeComposer for MSP430.
- CodeComposer for Piccolo, for the TMS320F280xx parts.
8086
- Digital Mars C.
- MASM32.
Both 8086 entries install from the same bundle, so downloading either one gives you both. The debug formats these tools produce, and the build settings needed to make them work without a BIOS or an operating system, are covered in the 8086 model documentation.
Python
- MicroPython (Proteus), included with Proteus, for the Raspberry Pi Pico, ESP32-S3 and PyBoard families.
- Python 3 (Proteus), included with Proteus, for the Raspberry Pi models.
Python firmware is developed in the same way as C and C++ firmware: you create a project against one of these toolchains and then edit, build, simulate and debug it inside VSM Studio exactly as you would a compiled project. The language itself, the modules that are available to a simulated board and the limitations of the interpreter are documented separately in the MicroPython manual.
PICAXE
- PICAXE, included with Proteus, covering the PICAXE 08, 14, 18, 20, 28 and 40 series parts.
Legacy Toolchains
These toolchains have been superseded. They are hidden in the Compilers dialogue unless you already have one of them installed or you tick Show legacy compilers, and the New Project wizard will not offer one until it has been installed.
- Arduino IDE 2.
- WinAVR.
- HI-TECH C for PIC10/12/16.
- HI-TECH C for PIC18.
- MPLAB C18.
- MPLAB C30.
Building Outside VSM Studio
Compiling inside VSM Studio is a convenience, not a requirement. Choosing a toolchain from the list above is the usual route for small and medium projects, and it is the route the tutorials take, but a firmware project can equally well be built somewhere else and still be simulated in Proteus.
A large project built on vendor middleware, a 35-file STM32 project for example, is often better served by its own vendor IDE such as STM32CubeIDE or MPLAB. In that case you build and debug in the IDE and attach it to the running simulation over the GDB server that the Cortex-M targets expose, so you keep the editor, the build system and the debugger you already use while the hardware around the processor stays simulated.
Where you simply want the simulation to run a binary that was built elsewhere, you do not need a firmware project at all. Attach the compiled file to the processor by hand through its Edit Component dialogue on the schematic and simulate as normal.
See Also:
Compiler Detection
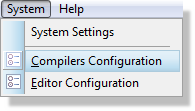
When you first open the VSM Studio module on a new Proteus install it will automatically scan your computer to detect existing installations of supported compilers. You can view the results of this scan by selecting the Compilers Configuration command from the System menu.
The dialogue lists one toolchain per row in three columns:
- Compiler, the name of the toolchain. Toolchains that are included with Proteus are shown in a different colour.
- Installed, which reads Yes or No where nothing needs to be fetched, and otherwise carries the button that fetches the toolchain for you.
- Compiler Directory, the folder VSM Studio will use for that toolchain. You can click in this field and type or paste a path directly.
The button in the Installed column is labelled Download where Proteus can fetch the installer and run it for you, and Goto Website where the toolchain has to be installed from the vendor's own site. Which of the two you get depends on how the toolchain is distributed, not on whether it is free or commercial: the open source SDCC compiler offers a Download button, while the commercial BASCOM-AVR offers Goto Website. Either way the button is disabled once the toolchain has been configured.
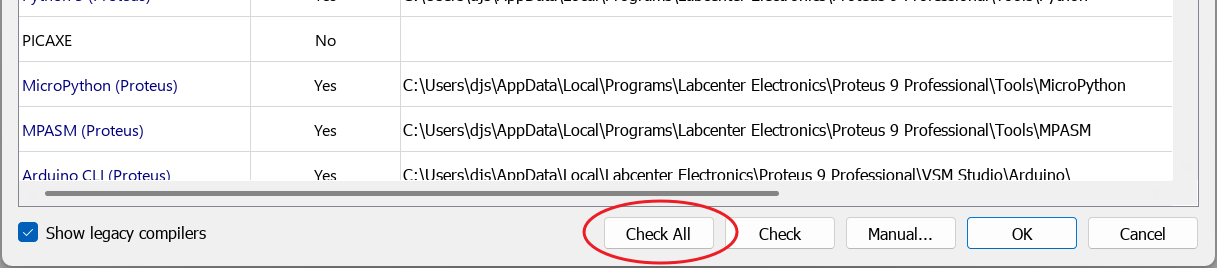
- Use the Check All button to perform a full re-scan and locate new installations.
- If you select a compiler in the list you can use the Check button to attempt to locate that particular compiler.
- If you have a compiler installed on another drive you can manually tell VSM Studio where it is by selecting the compiler and then using the Manual button. Alternatively, click on the compiler directory field for the compiler in question and type the location in manually.
- Toolchains that have been superseded are hidden from the list unless they are already installed. Tick the Show legacy compilers box if you need to see or install one of them.
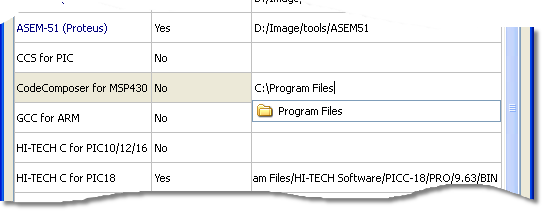
Entering the location of a compiler manually.
Exit the dialogue form with the OK button to commit changes.
To Install a New Compiler:
- Open the Compilers Configuration dialogue from the System menu in VSM Studio.
- Click the button in the Installed column of that compiler's row, which will be labelled either Download or Goto Website.
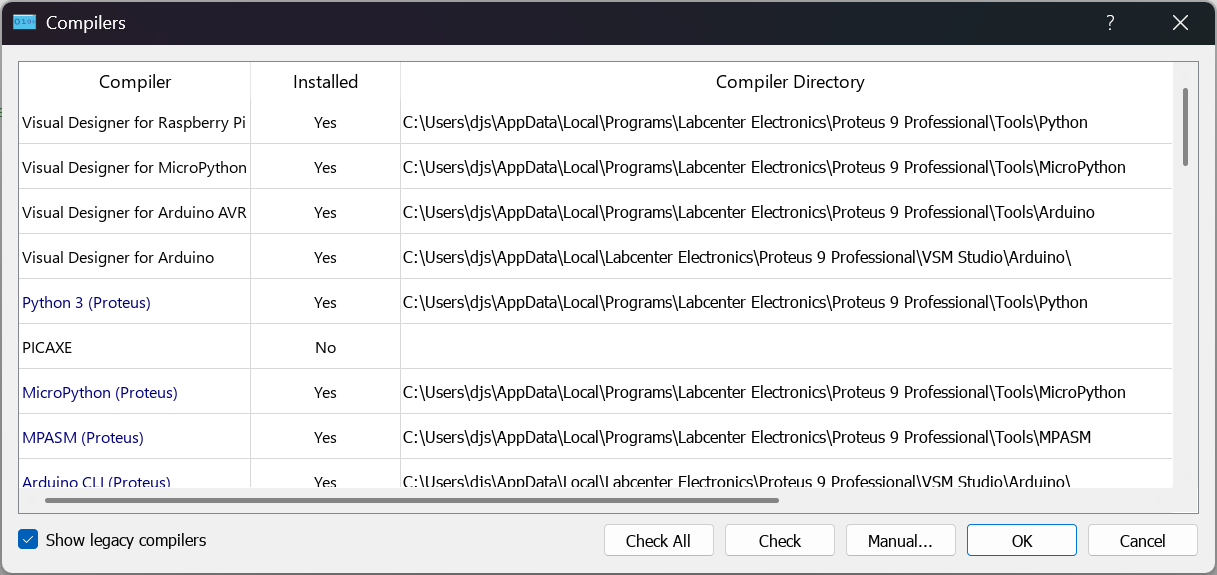
- Install the compiler in the usual way. A Download button will fetch the installer and start it for you, and you may need administrator privileges to complete the installation.
- Use the Check All button on the Compilers dialogue to locate and automatically configure compiler settings.
The results of any scan will appear in the Output Window. Note that older versions of some compilers are not supported as they either cannot be found to be tested or cannot generate a suitable output format.
A supported toolchain that has not yet been configured is still offered by the New Project wizard, where it appears with a (not configured) suffix. Configure it from the Compilers dialogue before you try to build.
Use the F1 key or click the mouse on the question mark on the dialogue form for more detailed information.
Arduino Toolchains
Arduino boards are handled a little differently from the other families. All Arduino projects build through a single toolchain, Arduino CLI (Proteus), which is included with Proteus and requires no separate download or installation.
Each Arduino board belongs to a platform: a versioned package containing the board core and the matching compiler. These packages are hosted on the Labcenter servers and are downloaded and installed automatically the first time you build a project for a board on that platform. Since Labcenter controls which platform versions are in use, the toolchain for a given board is always one that has been tested with Proteus and is not affected by third party updates.
The index of available platforms is refreshed automatically when a new version of Proteus is installed, or when the Arduino CLI entry is re-checked from the Compilers dialogue, so newly published boards become available without waiting for a product update.
Some boards are served by more than one platform. For example, the Arduino Uno R4 uses the Proteus VSM platform in the Debug configuration, where the Arduino core runs natively inside the simulator, and the standard manufacturer core in the Release configuration, which produces a binary for programming the real board. The appropriate platform is selected automatically for each build configuration; the platform and its pinned version can be inspected from the Project Settings dialogue if required.
Projects saved against the older Arduino toolchains are migrated to Arduino CLI (Proteus) automatically when they are next loaded. The build settings for the project are reset to the defaults of the new toolchain. This is why the retired Arduino AVR, Arduino AVR (Proteus) and Arduino for STM32 (Proteus) entries no longer appear in the compiler list above.
Compiler Configuration
Once a compiler has been detected it is automatically configured to produce output compatible with source level debugging in Proteus VSM and also to produce binary for programming a physical chip with. These are called the Debug and Release configurations respectively.
In practice, only the Debug configuration is relevant to working with Proteus and is therefore always the default when a project is opened or created.
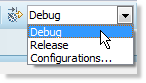
Debug configuration for use with Proteus simulation.
For many projects all we need do is build the project (Project menu, Build Project command) once firmware has been written. However, if need be, all compiler, assembler and linker options can be edited or added to from the Project Settings dialogue form.
Project Settings is on the Project menu inside VSM Studio. It is also on the right click context menu of the project file tree and on the Build toolbar.
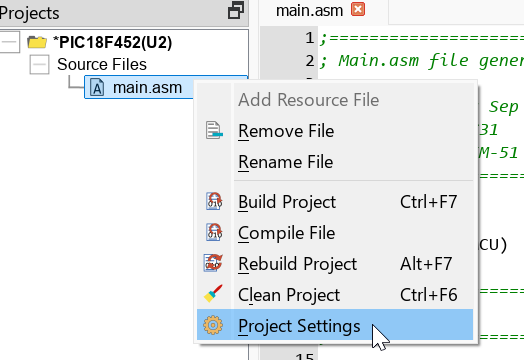
The Project Settings command on the project tree context menu.
Ensure that you are editing the correct configuration and switch to the Options tab of the dialogue.
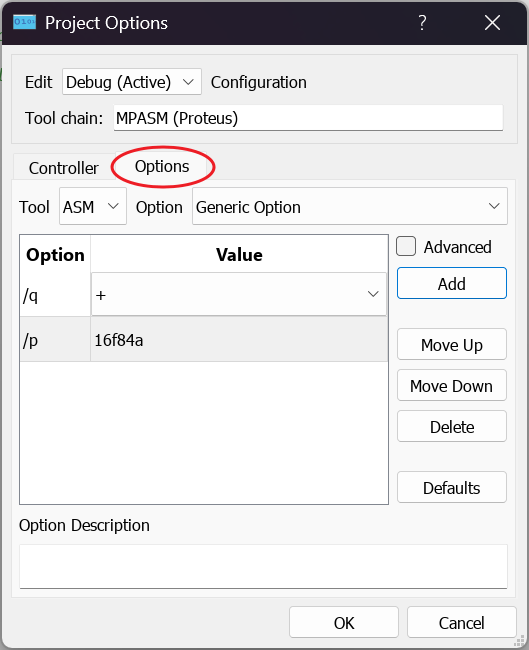
Editing compiler options for the Debug configuration.
There are a number of tools (depending on which toolchain you are using) which can be selected individually from the Tool list at the top left of this tab and then a number of options which can be added for each tool. Pick an option from the Option list and use the Add button to place it in the table below, where you can set its value, re-order it with the Move Up and Move Down buttons or remove it with Delete.
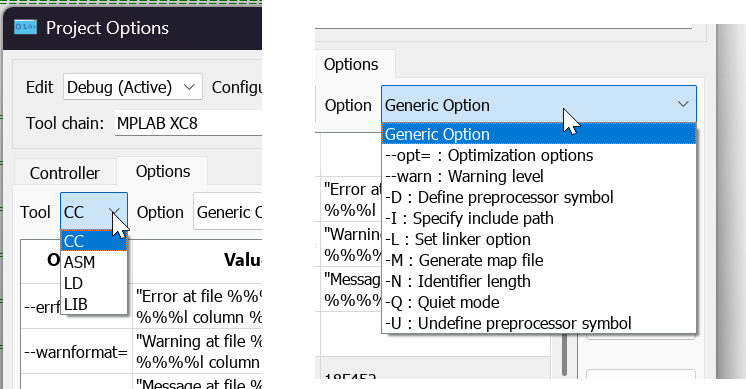
Editing configuration options for tools in a toolchain.
Two further controls make the tab easier to work with. The Advanced checkbox extends the Option list to include the seldom needed options that are otherwise held back, and the Option Description pane at the foot of the dialogue explains whichever option is currently selected, together with the type of value it expects.
More information on particular options can be found in the reference manual for the specific compiler.
The Defaults button on the dialogue will restore the settings to the preset configuration.
Once selected, you cannot change the toolchain for a given project. If you have mistakenly selected a toolchain you will need to delete the project (right click on the project in the VSM Studio project tree) and then create a new one.
Output Files
When you compile in Debug configuration (the default) the output files are largely dependent on the compiler. For example, in the PIC world the object file is typically a COF file, whereas for AVR and ARM it is normally an ELF/DWARF file pair. You don't actually need to worry about any of this since VSM Studio will automatically configure the compiler to produce the most suitable fileset for simulation with Proteus. Since VSM Studio is part of Proteus, output files are automatically transmitted to the schematic for simulation as well. In short, no user action is required for simulation with Proteus.
If however, you are then programming a physical device, you will need to make some adjustments. First, you will need to change the configuration from Debug to Release. This will ensure generation of a binary HEX file.
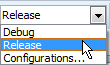
Selecting the Release configuration.
Unlike a Debug configuration, the Release configuration will drop the HEX file outside of the Proteus project file (*.pdsprj), allowing you to use it for programming a real board. This file is deposited in the same directory as the Proteus project but separately.
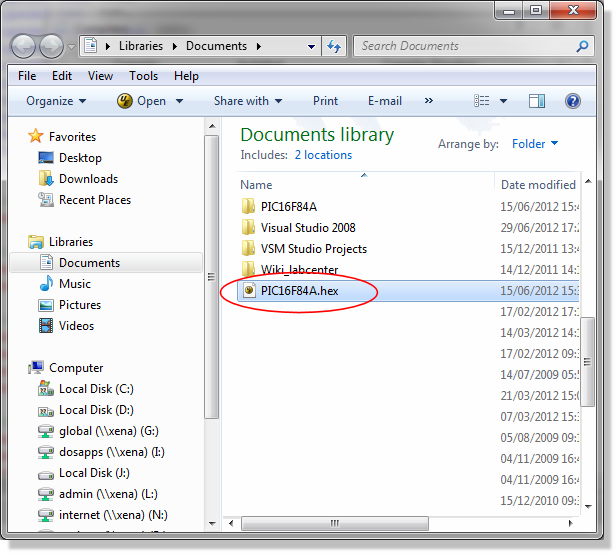
The HEX file from a Release build, deposited in the same directory as the Proteus project.
You do not have to leave VSM Studio to get that file onto the board. The Upload command on the Build menu (CTRL+F8) writes the program to a connected hardware board, and it is covered in Firmware Development.