AUTOROUTER DIALOGUE FORM
Overview
All autorouting operations, regardless of the mode of operation, start by invoking the Auto-router command on the Tools menu. This topic discusses the various configurations on the dialogue form.
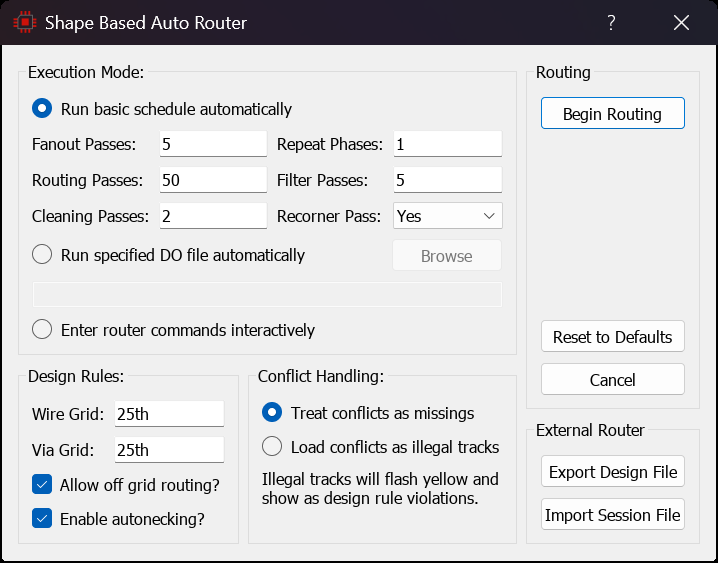
The Shape Based Auto Router dialogue form
Despite its seeming complexity, the basic operation of the router is extremely simple. Many configuration options are provided for additional flexibility and the default values are sufficient for all but the most complex of boards. See the basic operation topic for practical usage guidelines, and the interactive auto-routing topic for more on that mode.
Dialogue Warnings
Two advisory labels appear at the top of the dialogue form when the design calls for them. Neither prevents routing; both tell you about work that has to be done after routing.
Note: Microvia styles are not applied by the autorouter. Use the Room dialogue to apply microvia styles to routed vias after autorouting.
This note appears when the design contains one or more DRC rooms that have Use Microvia ticked and a via style nominated. See HDI Boards for the post-routing workflow.
Warning: This design contains exclude-foreign DRC rooms. The autorouter cannot respect exclusion room boundaries — run DRC after autorouting to check for violations.
This warning appears when the design contains one or more DRC rooms with Exclude Foreign set. Exclude-foreign rooms are not passed to the router at all, so the router may take foreign copper straight through them. See Exclude Foreign Rooms for what to do about it.
Execution Modes
The main section of the dialogue form allows you to choose one of three execution modes:
- Run basic schedule automatically, the router builds a standard routing schedule from the pass counts on the dialogue form and runs it.
- Run specified DO file automatically, the router runs the routing script you nominate.
- Enter router commands interactively, Proteus opens a command console and you type routing commands yourself.
All three modes are available in every version of Proteus PCB Design. The controls associated with a mode are enabled only when that mode is selected: the pass counts and the Recorner Pass setting are greyed out unless Run basic schedule automatically is selected, and the DO file field and its Browse button are greyed out unless Run specified DO file automatically is selected.
Several additional options are available in the fully automated mode. Whilst in most cases the default settings will suffice, these options provide extra flexibility for more complex or densely packed PCBs.
Fanout Passes
These passes will autoroute small escape wires with a via from SMD pads, thereby allowing easier connection to the pads during the main routing passes.
Routing Passes
The number of principal routing passes. The default is 50 and there is only marginal benefit in increasing it beyond that; for complicated or densely packed boards we recommend increasing the repeat phases rather than the number of routing passes.
Cleaning Passes
Cleaning passes will basically rip-up and reroute each net with high via cost and the highest cost for making clearance and crossing violation. The default value is adequate for almost all boards.
Repeat Phases
This allows you to specify the number of times the routing passes and cleaning passes will repeat. The autorouter is an adaptive shape based router so repeating the route/clean passes will typically help achieve higher completion. The default value is adequate for most boards but increasing the repeat value will have benefit in more complex or densely packed layouts.
Filter Passes
The filter pass will be performed after the router has repeated the route/clean passes the specified number of times. This will simply rip any tracks that have conflicts at the time of invocation. The default value for this is fine for almost all layouts.
Recorner Pass
This pass is performed last and changes 90 degree wire corners to 135 degrees to reduce track length.
Design Rules
These options provide additional guidelines to the router and indicate the default behaviour for the routing algorithms. They are not the same thing as the board design rules, which are set up in the Design Rule Manager on the Technology menu. As with the scheduling options detailed above, the default values will suffice for the vast majority of boards.
Wire Grid
Specify the default wire routing grid. This advises the router as to the preferred grid for placing tracks but does not actually constrain it to routing on that grid. The default is 25th.
Via Grid
Specify the default via routing grid. This tells the router the preferred grid for placing vias but does not constrain it to routing on that grid. The default is 25th.
Allow off grid routing?
This option, which is on by default, determines whether the router is constrained to routing on grid (grid based routing) or is able to route off grid when necessary. We strongly advise leaving this option enabled, as disabling it will adversely affect router performance in most cases.
Enable autonecking?
Autonecking, which is on by default, allows the router to narrow a track to the neck style of its net class in order to squeeze between pads or through a tight gap. Where necking is used, the design rule checks for that section of track are made against the neck style rather than the normal trace style. Turn it off if you want every routed track held to its full width for the whole of its length. The neck style itself is set per net class in the Design Rule Manager.
Conflict Handling
The router works on a costing basis so it first places all tracks according to their ideal position and then increases the costing of illegal tracks until there are no conflicts remaining. This means that in the unlikely event that the router does not achieve completion there will be illegal tracks placed on the board, and these options allow you to configure how you would like Proteus to handle such tracks. The dialogue also carries the reminder that illegal tracks will flash yellow and show as design rule violations.
The setting matters most when you stop the router yourself. A routing run in progress can be aborted by pressing ESCAPE, and what happens to the conflicts at that point is decided here.
Treat conflicts as missings
In this case, when the router is aborted or stops, any tracks that cross other tracks or are deemed illegal are ripped from the layout and the connection reverts to a ratsnest line. This is the default.
Load conflicts as illegal tracks
When selected, all conflicts are left on the layout as illegal tracks, flashing yellow and showing as design rule violations. Note however that it is possible, particularly if you abort the router early, to end up with a very large number of conflicts, and trying to sort out such a tangle on the layout is more or less impossible.
Default Settings
Your autorouter settings are remembered between sessions, which is why the dialogue form does not simply come up at its factory values each time. The Reset to Defaults button puts everything back to the values below.
| Setting | Default | Maximum |
| Fanout Passes | 5 | 20 |
| Routing Passes | 50 | 100 |
| Cleaning Passes | 2 | 10 |
| Repeat Phases | 1 | 20 |
| Filter Passes | 5 | 20 |
| Recorner Pass | Yes | |
| Wire Grid | 25th | |
| Via Grid | 25th | |
| Allow off grid routing? | On | |
| Enable autonecking? | On | |
| Conflict Handling | Treat conflicts as missings |
Command Buttons
Begin Routing
Invokes the router and commences auto-routing of the board. What happens next depends on the execution mode: the basic and DO file modes run their schedule and return you to the layout when it finishes, whereas interactive mode opens the command console and leaves you in auto-routing mode until you exit it.
Reset to Defaults
Resets all the configurable options to the values listed under Default Settings above.
Cancel
Returns you to the layout without invoking the autorouter.
External Router
The two buttons in the External Router group let you route the board with a separate application that reads the SPECCTRA design file format.
Export Design File
Writes the board, its netlist and its design rules out as a design file with the extension .EDF, ready to hand to the external router.
Import Session File
Reads back a session file with the extension .SES produced by the external router, and applies the routing it contains to the layout.
See Also: