OBJECT PROPERTIES
Introduction
There are two distinct types of object property: system properties and user properties. The former comprise a set of reserved keywords which have special functions within Proteus itself, whereas the latter relate either to external programs, or may relate to your own particular use of the software (for example, the Bill of Materials report).
System Properties
System properties are properties whose keywords have special meaning in Proteus. For example, the DEVICE property of a component object directly determines the library part assigned to it. Some of these properties are textual, so that component REF and VALUE labels are directly accessible from the Edit Component dialogue form, but others such as the aforementioned DEVICE property are manipulated as a result of graphical operations.
In general, you need only concern yourself with system properties if you wish to read their values with the Search and Tag command, or modify them with the Property Assignment Tool. For example, you might wish to tag all the 7400 components in your design. This requires you to know that the system property that will hold the library part name is called DEVICE.
Details of the system properties used by each type of object are given in the Object Specifics section of this documentation.
The BOMSKIP Property
One system property is worth singling out because it does not behave like the others. BOMSKIP is not stored on the component at all: it is another name for the Exclude from Current Variant setting, and reading it returns TRUE or FALSE according to whether the part is marked as not fitted in the variant you are currently working in. Assigning BOMSKIP with the Property Assignment Tool sets that same flag rather than adding a property to the property block, which is why the value never appears in the block when you open the Edit Component dialogue form.
This makes BOMSKIP a convenient way to mark or unmark a whole set of parts in one operation, and a convenient way to search for the parts already marked.
User Properties
Components, sub-circuits and simulator gadgets can carry an unlimited number of extra properties, in addition to their standard system properties. These user properties are held in a block of text known as a property block and consisting of lines such as:
SUPPLIER=XYZ Electronics
The most convenient and common method for editing user property blocks is the spreadsheet interface in the Design Explorer, although you can also do so directly on the dialogue forms of the various objects themselves. In either case it's important to realise that you are making local changes to the design and not persistent changes to the library parts. A more stringent approach would be to correct or update the library parts via the Library Manager so that the master devices were correct, and then pick the updated parts back into the current schematic. Either method is fine and the decision may largely be one of company policy with respect to local property changes.
One advantage of updating the library parts versus making local changes is that the Manage Changes command on the Library menu will do a better job of handling design revisions.
Editing Properties across Many Objects
Where you need to change the same property on a large number of parts, the Design Explorer's search is the easiest route. It presents the matching parts and their properties in a spreadsheet-like grid, so you can see every value at once and edit them in place. Changing the package of all the 10nF capacitors in a design, for example, is far better done as a Design Explorer search than by tagging the capacitors and running the Property Assignment Tool over them.
To edit user properties via the Design Explorer
- Add the properties to the component grid.
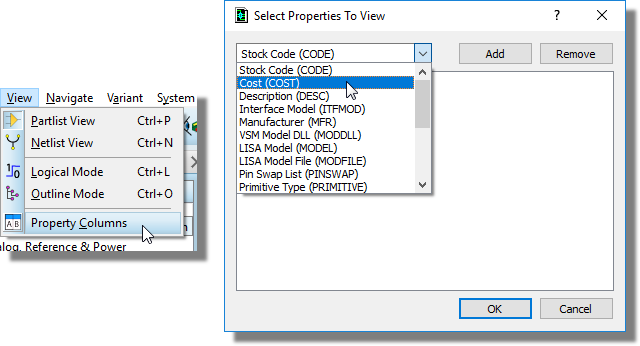
Adding property columns to the Design Explorer grid
- Change the values.
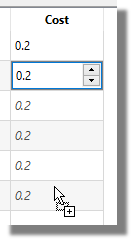
Editing a property value in place in the grid
If you want to operate on only a subset of parts, for example to change the package of all the 10nF capacitors, first use the search tab to filter the list of parts and then follow the procedure above.
See Also:
Searching and Filtering in the Design Explorer
To edit an object's user properties individually:
- Bring up the object's dialogue form by tagging it and selecting Edit Properties from the resulting context menu.
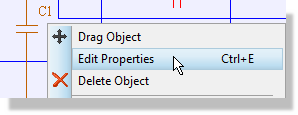
- If the object can hold user properties, the dialogue form will have a text editor box labelled Properties. Point below any existing text in this box and click left.
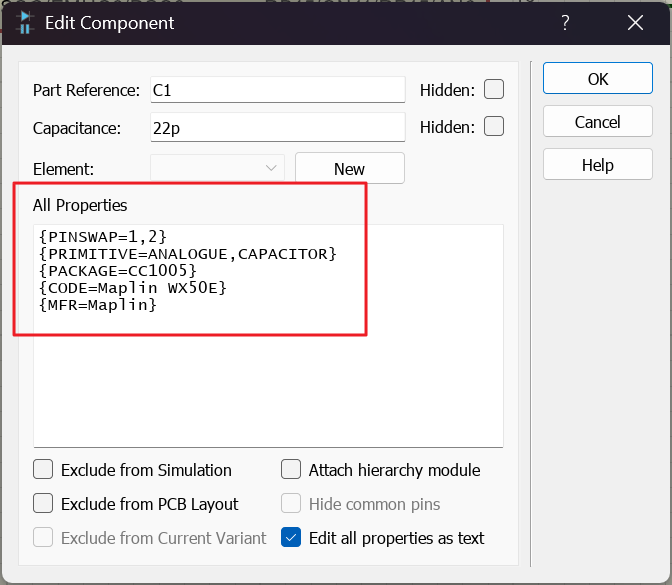
- Edit the text as required. Each property should consist of a single line comprising a keyword and value separated by an equals sign (=).
User property keywords should, as a rule, consist of letters, numbers and underscores only. Under no circumstances should they contain a space, a comma, a double quote or an equals sign.
Manufacturer and Stock Code
The MANUFACTURER and STOCKCODE properties are a special case. They are indexed properties, which means that they normally live on the library device rather than on the placed component, and the value you see on the Edit Component dialogue form is the one held by the device. If you leave that value alone it stays where it is; if you change it, the new value is written to the component as a local property and from then on overrides the device.
This is worth knowing if a stock code appears not to update. Correcting the value in the library will not change a component that already carries a local override, and the reverse is also true: a component with no override picks up the library value automatically.
Controlling What is Displayed
In accordance with the general behaviour of text on the schematic, if a property assignment is enclosed in curly brackets ('{' and '}') then it will not be displayed on the screen. For example, entering:
{PRIMITIVE=DIGITAL}
will define an object as requiring digital simulation, but this text will not actually appear.
Occasionally, one may want just the value to appear, in which case you can do:
{MODFILE=}OPAMP
If you need a curly bracket to appear as part of the value itself, double it. A property value containing '{{' or '}}' is displayed with a single bracket and the doubled pair is not treated as a visibility marker.
In theory you can put curly brackets in other places. However, when the Property Assignment Tool modifies property blocks, it works on the assumption that if used at all, curly brackets have been placed as shown in the above examples. If they have been placed elsewhere, then you may get unexpected results.
Properties and Managed Library Parts
Do not change properties on managed library parts. The whole point of a managed library is that the part carries correct, librarian-approved information, and the software enforces this: the properties text editor on the Edit Component dialogue form opens read only for a managed part, and the Property Assignment Tool skips managed properties on managed parts rather than assigning them.
Where a part does need different information, the correct route is for the librarian to release a new version of the library and for users to update from it, rather than for the value to be edited in one design. The Manage Changes command on the Library menu is the tool that reconciles a design with a revised library.
The Property Assignment Tool gives no message when it skips a managed property. If you run it across a design of managed parts and nothing appears to happen, this is why; the tool has not failed, it has declined to write.
See Also:
Managed Properties (Library Manager)
Properties and Assembly Variants
The property model is aware of assembly variants, and the behaviour you get depends on which variant is currently selected. The current variant is chosen from the Variant Selector on the toolbar, and it affects properties in three ways.
- Exclude from Current Variant, on the Edit Component dialogue form, marks the part as not fitted in the variant you are working in. The option is available only when a variant other than the base variant is selected, because a part that is not fitted anywhere does not belong in the design at all.
- BOMSKIP is the property-level name for that same setting, so the Search and Tag command and the Property Assignment Tool can read and write it across many parts at once.
- The read-only locks described above apply on the base variant. On any other variant the part value and the managed properties become editable, because a variant is precisely where a part is expected to differ from the approved baseline.
See Also:
Property Definitions (PROPDEFS)
A property definition supplies extra detail about a named user property: what it means, what kind of value it accepts, what range that value must fall in and what it should default to. Where a definition exists for a property, that property is given its own labelled field on the Edit Component dialogue form instead of appearing as a line of text in the property block, which makes it far easier to see what a particular library part expects.
See Also: