Authoring a Lesson Plan
Introduction
Most educators already have a set of lab exercises that they know work well: a circuit that illustrates the right concepts, a sequence of measurements that builds understanding, and a good sense of where students typically get confused. The structured lesson plan system in ProTutor is designed to capture all of that knowledge and deliver it consistently to every student through an AI tutor.
The most effective way to create a lesson plan is not to describe it in the abstract, but to perform it. You work through your own exercise in Proteus while the assistant watches, and it builds the plan from what actually happens. That approach captures the things a form could never ask you for: what a wrong answer looks like, what a realistic measurement tolerance is given the actual simulation results, and how much of a hint is appropriate at each stage.
All of this happens inside Proteus, in the same chat panel you use for everything else. There are five steps.
- Create or import the plan.
- Switch the project into authoring.
- Work through the exercise as the student.
- Correct the plan as you go, using square brackets.
- Hand the project over for trial.
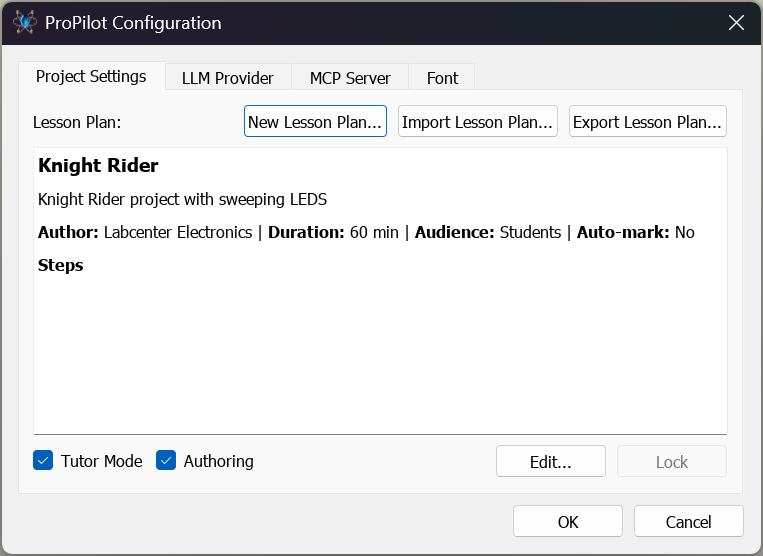
The Project Settings tab with Tutor Mode and Authoring ticked, showing the New Lesson Plan..., Import Lesson Plan..., Edit... and Export Lesson Plan... buttons.
Before You Start
Gather two things:
Your existing lesson materials. If you have a PDF lab worksheet, attach it to the chat and the assistant will work from it while building the plan. It knows the structure a lesson plan has to take, so it can get you from a worksheet to a draft plan far more quickly than starting from a blank page. Word documents cannot be attached directly, so copy the text out of the document and paste it into the chat instead.
A Proteus project in the state a student would receive it. Think carefully about this starting state, because it depends on the nature of the exercise. It might be a blank schematic with the components already picked into the parts bin but not yet placed, a partially completed circuit with key connections missing, a fully wired circuit ready for measurement, or a circuit with firmware already loaded awaiting modification. This project file is what gets distributed to students, so it needs to be right before you begin.
Save a clean backup of your project in its student starting state before you begin authoring. The authoring session involves running simulations and will often involve changing the circuit.
Proteus ships with worked examples. Look in the ProTutor Lesson Examples folder under Samples for complete, ready-to-run lesson plans, including the 555 oscillator exercise used as the worked example in this manual. The CAN sample projects also contain lesson plans, shipped switched off, which you can enable from Project Settings if you want to explore them. Note that you need an AI model configured with your own API key to run any of them, since the lesson is delivered by the assistant.
See Also:
Step 1: Create or Import the Plan
Open the settings dialogue with the cog button. The Project Settings tab is shown first. Tick Tutor Mode, and two buttons appear.
New Lesson Plan...
Click New Lesson Plan... to start from scratch. Proteus asks for the details that describe the lesson as a whole:
- Title, the name of the lesson as the student will see it
- Author, normally you or your institution
- Description, a sentence or two on what the lesson covers
- Target Audience, so that the assistant can pitch its language at the right level
- Duration (minutes), the time you expect the exercise to take
- Show results to student (auto-mark), which determines whether the student sees their mark at the end of the session
Click OK and Proteus creates an empty plan, ticks Authoring for you, and prepares the chat for the design conversation described in Step 2.
Import Lesson Plan...
Click Import Lesson Plan... to load a plan that already exists as a JSON file, for example one exported from another project or shared by a colleague. The file selector filters for Lesson Plans (*.json). The file is validated on import, and a file that is not a lesson plan is rejected with an explanation rather than being loaded.
Edit...
Once a plan is loaded, the Edit... button reopens the same details you supplied when creating it, so you can revise the title, description, audience, duration or auto-marking setting at any time.
Step 2: Switch to Authoring
Tick the Authoring checkbox on the Project Settings tab. This is what makes the lesson plan editable, and it implies Tutor Mode, so ticking it will tick Tutor Mode as well if you have not already done so. The checkbox becomes available once a plan exists in the project.
Authoring proceeds through two kinds of chat sessions, and it is worth knowing which one you are in because they behave quite differently.
Creating
A Creating session designs the shape of the lesson. You and the assistant agree what the steps are, what each one asks the student to do, and how each will be judged complete. Nothing is rehearsed and no expected values are captured; the output is a skeleton. Each step is given one of seven types, which determines how the tutor will present and validate it:
| Step type | What the student does |
| observe_and_identify | Examines the schematic or the simulation and answers questions about what they see. |
| measure_and_record | Takes an instrument reading and reports it. Both the value and the method are checked. |
| calculate | Computes a value, usually from measurements taken earlier in the lesson. |
| configure | Adjusts an instrument setting or a component value. |
| draw_and_wire | Places or connects components. The netlist is checked for the expected change. |
| code | Writes or modifies firmware. The build is checked, and observable simulation behaviour can be checked too. |
| analyse | Explains or reasons about circuit behaviour. Open-ended, and often deferred to marking. |
When the structure is agreed, the assistant commits the skeleton and opens a Testing session so that you can start filling it in.
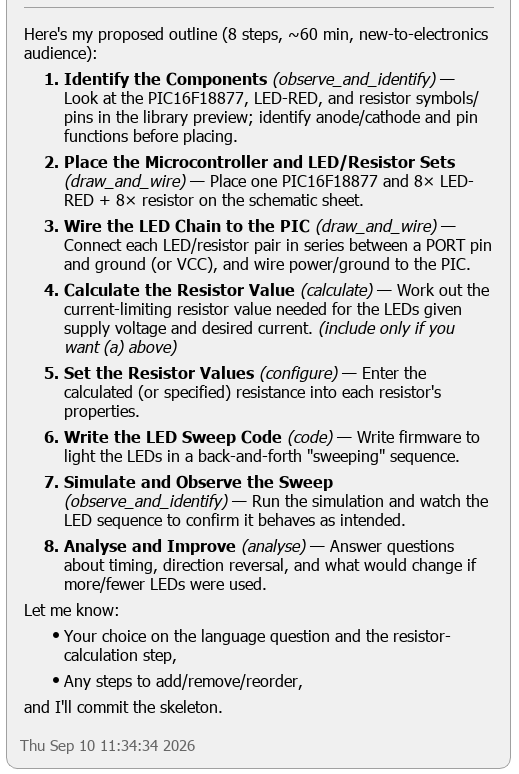
A Creating session agreeing the step structure of a new lesson plan, with the proposed steps listed in the chat.
Testing
A Testing session is the rehearsal. The assistant plays the runtime tutor and you play the student, working through the lesson from beginning to end in the live simulation. This is where the plan acquires everything that makes it usable: the expected values, taken from what the simulation actually produced rather than from a textbook; the tolerances; the correct measurement methodology for each reading; and the progressive hints.
Starting a new chat while Authoring is ticked gives you a Testing session, so you can return to rehearsal at any time.
Step 3: Work Through as the Student
In the Testing session, do the exercise. Run the simulation, take the readings, answer the questions as a student would answer them. For each step the assistant presents the instructions exactly as a student will see them, watches what you do in Proteus, and records what it needs: the values you measured, where you put the probes, which meter mode you used, and anything you got wrong along the way.
It will also ask you directly about the things the rehearsal cannot show it, such as whether a step can be marked automatically, what the most common student mistake is at that point, and how readily hints should be offered.
The progress bar under the chat header shows one segment per step and marks the ones that are done. In a Testing session it is also clickable, so you can jump straight to a particular step rather than working through the whole lesson again to reach the one you want to revise.
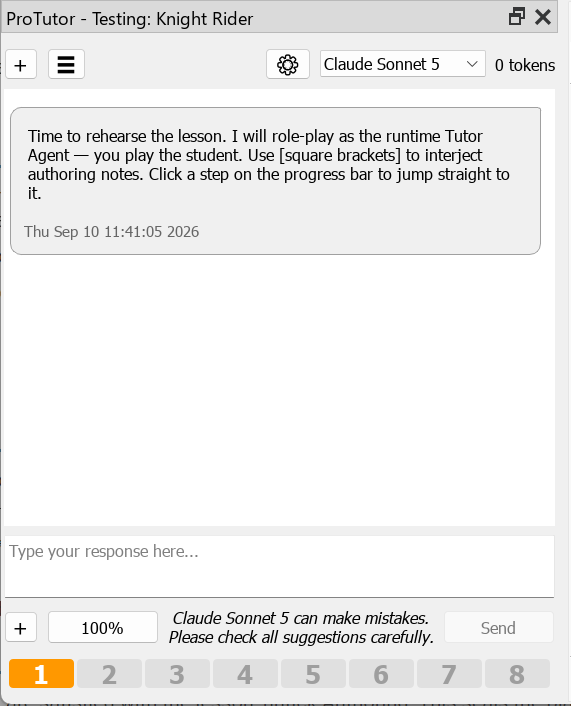
A Testing session rehearsing a measurement step, with the clickable step progress bar under the chat header.
Step 4: Correct as You Go with Square Brackets
You do not have to stay in character. Anything you type in square brackets is treated as a note to the author rather than an answer from the student, so you can correct the plan without breaking the flow of the rehearsal. For example:
[students always get this wrong here, add a hint about the meter mode]
[the user must switch to the Signals tab of the analyser at this point]
[reword the instruction, "measure across R2" is clearer]
Bracketed notes are folded into the plan as hints, context notes, or guidance for the tutor, depending on what they say. This is a convention rather than a command syntax, so write the note as you would say it to a colleague; there is no fixed grammar to remember.
Step 5: Hand Over
When you are satisfied with the lesson, untick Authoring. This seals the plan for running: the tutor will now deliver it rather than edit it. If you want to prevent students from reading the plan, also click Lock and set a password, as described below.
Save the project and pass it to a colleague to try as a real student. This is the most valuable test you can run, because a second person will find the wording that is ambiguous and the step that gives too much away, and you can feed their comments back into another authoring session.
Look out in particular for anything that:
- Gives too much away too early
- Has hints that are unhelpfully vague or, conversely, too revealing
- Has validation that passes when it should not, or fails when it should pass
- Has wording that would confuse students at the target level
Unticking Tutor Mode discards the lesson plan. There is no confirmation prompt, and the plan is gone once you click OK. To stop authoring and leave the lesson in place, untick Authoring and leave Tutor Mode ticked. Keep an exported copy of any plan you care about.
Importing and Exporting Lesson Plans
The lesson plan lives inside the Proteus project file, which is what makes distribution simple: there is no database and no server, and the project can be handed out by whatever means your institution already uses.
Both directions are available from the Project Settings tab. Import Lesson Plan... loads a JSON file into the project, and Export Lesson Plan... writes the current plan back out to a JSON file, suggesting a filename based on the lesson title. Exporting is worth doing routinely. It gives you a copy outside the project file, which you can keep under version control, share with a colleague, or use to recover a plan that has been lost from a project.
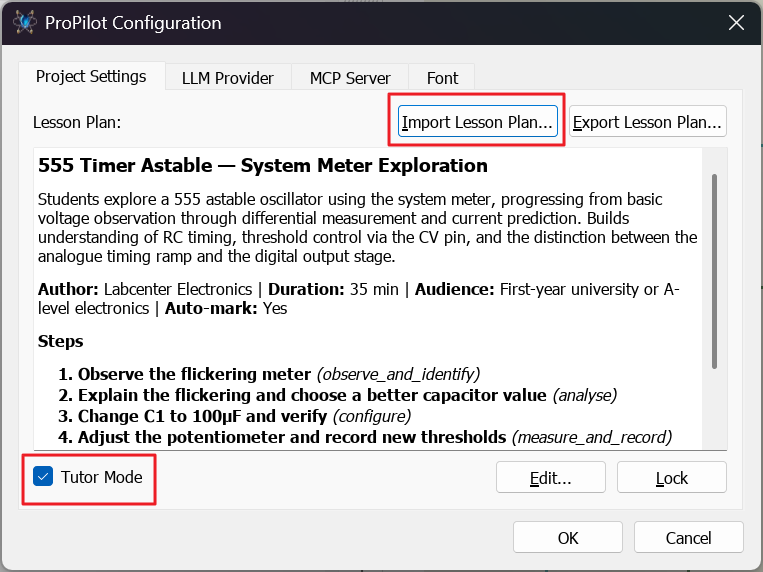
The Project Settings tab showing the Tutor Mode checkbox and the Import Lesson Plan... and Export Lesson Plan... buttons.
Locking the Lesson Plan
Before distributing the project, lock the lesson plan so that students cannot read it out of the settings dialogue. On the Project Settings tab, click Lock and set a password. With the project saved in that state, the plan is hidden in the dialogue and the import, export and edit controls are withdrawn, so a student opening the settings cannot extract the instructions, the expected values, or the answers.
Keep a record of the password. You need it to unlock the plan for further editing, and it is not recoverable: Proteus stores only a fingerprint of the password, never the password itself. For ongoing work it is easiest to keep an unlocked copy of the project for yourself and lock only the copy you distribute.
Be clear about what the lock does and does not do. It is tamper evidence rather than encryption. The fingerprint is calculated over the plan text, so a plan that has been altered outside Proteus will no longer unlock even with the correct password, which is exactly what you want for academic integrity. However, the plan text itself remains in the project file. A determined student with the right tools could read it, so the lock should be understood as a proper deterrent rather than a guarantee.
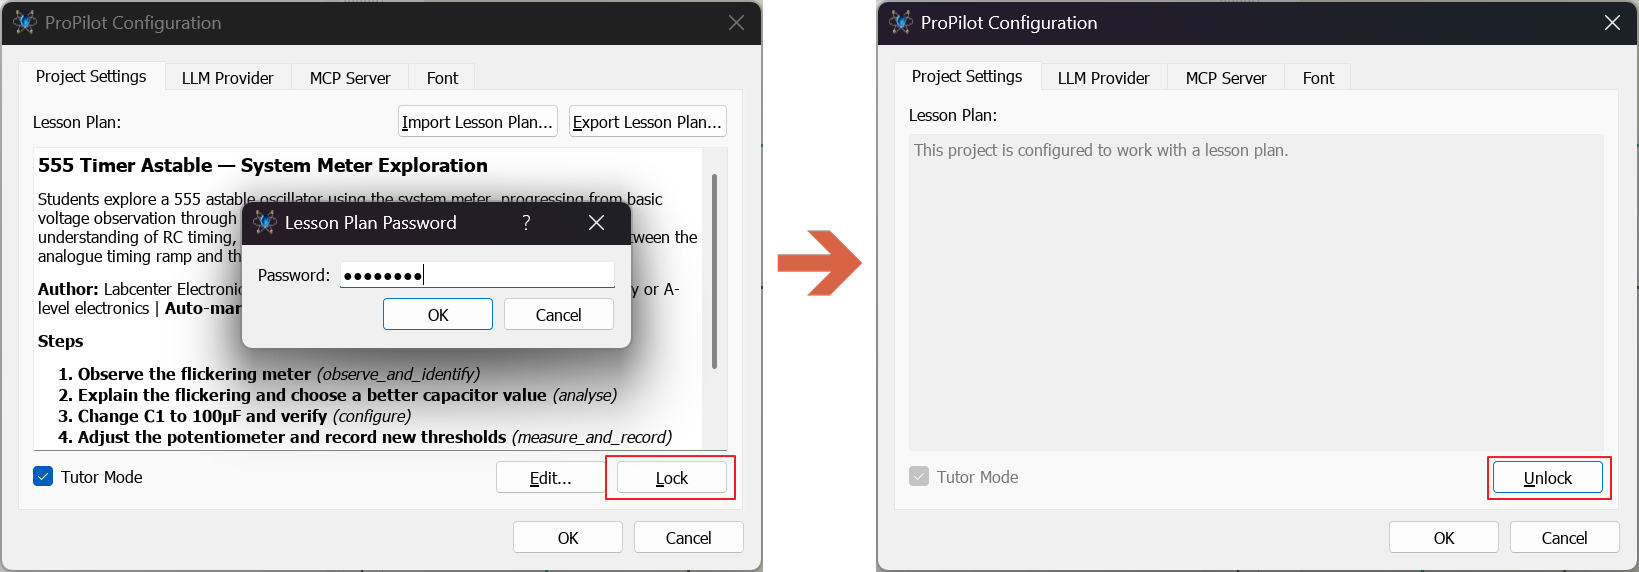
The Project Settings tab with the lesson plan locked.
When you lock a plan, Proteus offers to delete the chat sessions stored in the project. Accept if you have been rehearsing in this copy, since those transcripts contain the answers.
How the Lesson Plan is Stored
Three pieces of information are held in the project file, and it is useful to know where they are if you ever need to reason about what a student received.
- Whether the project is off, tutoring, or authoring is held as a project property.
- The lesson plan itself is held as a project script, in the same slot used for ordinary project instructions. Proteus tells the two apart by shape, so a plan and a free-text instruction cannot be confused.
- The lock is held as a fingerprint of the password. The password is never stored.
Because everything lives in the project, a project file is a complete, self-contained lesson. Copy it and you have copied the exercise, the circuit, and the tutor's brief together.
Marking and Assessment
As a student works through a structured lesson, the tutor silently builds a progress report. This captures every answer given with its validation result, whether the correct measurement methodology was used, which hints were served and when, any mistakes detected and whether the student corrected them, and timestamps throughout. That structured record, together with the full chat transcript, is what makes assessment possible.
Internal Marking
Internal marking happens inside Proteus at the end of a session. If the plan is configured for auto-marking, the assistant marks the work as soon as the student finishes, reading both the plan and the progress report and producing per-step scores, comments on the student's understanding and measurement technique, and an overall grade. The results are shown to the student immediately, which is the most valuable form of feedback there is.
External Batch Marking
External marking suits a whole cohort. An external chat client connected to Proteus over MCP is pointed at a folder of submitted project files. It opens each project in turn, reads out the lesson plan and the progress report, marks the work, and assembles the results into a single consolidated report or spreadsheet. The marking runs outside the Proteus interface entirely, which is what makes it practical for a class or a year group.
The division of labour is deliberate. An external client can list the lesson sessions in a project and load one for review, but the marking itself is not performed by Proteus on its behalf: the client retrieves the plan and the progress report and does the assessment in its own session, where you can see and steer it. This is the one lesson workflow that genuinely belongs outside Proteus, and it is the reason to set up an external client if you teach at scale.
See Also:
Connecting External Chat Clients (MCP)
Scoring
The scoring rubric distributes marks across the steps, with the weights summing to 100. Each step is scored across several dimensions: correctness, methodology, independence in the sense of how many hints were needed, and accuracy. Deductions are applied for hints used, mistakes made, and extra attempts required. Skipped steps receive zero; incomplete steps receive partial credit. Grade boundaries follow a standard scale, and the full breakdown is preserved in the progress report.
If you are unsure how to weight the steps, the assistant will propose a distribution based on their complexity. As a rough guide, measurement and calculation steps typically carry 10 to 20 marks, analysis questions 15 to 25, and simple observation steps 5 to 10.
A Note on Suitability for Formal Assessment
Automated marking is best understood as a powerful formative tool rather than a replacement for human judgement in summative assessment. There are two sources of variability. First, model outputs are probabilistic, and borderline answers in particular may score differently across marking runs. Second, the tutor itself introduces variability: different students may receive subtly different levels of guidance during their session, so the conditions under which their work was produced are not strictly equivalent.
For formative use, which means giving students immediate feedback, helping teachers identify who is struggling, and surfacing common misconceptions across a cohort, automated marking is highly effective. For summative use it is better treated as a first-pass triage tool. Where a grade is consequential, the full chat transcript and progress report are preserved in the project file and available for human review, so a teacher can see exactly what the student did, what hints they received, and how the mark was arrived at. That makes moderation of borderline cases straightforward.
See Also: