What is IoT Builder?
IoT (Internet of Things) Builder provides an end-to-end workflow for the design of IoT appliances on Arduino, Raspberry Pi or MicroPython hardware. It can be added to Visual Designer for Arduino, Visual Designer for Raspberry Pi, or Visual Designer for MicroPython to develop remote user interfaces for embedded projects.
The workflow is flexible and intuitive. Start by designing the product hardware on the schematic by adding shields, HATs and breakout boards via the peripheral gallery. Then create the front panel in the IoT Builder editor, placing dials, buttons, charts and more. Finally, bind the user interface to the electronics using Visual Designer flowchart methods or C code (Arduino) / Python code (Raspberry Pi / MicroPython).
Once everything is working as expected, the firmware and front panel can be deployed to the real hardware. Point the controlling device at the target on the network, let it acquire the front panel over TCP/IP, and then control the hardware from your mobile phone, tablet or PC.
- Design your hardware with a library of ready-made shields/hats.
- Design your front panel with buttons, switches, dials, displays and charts.
- Link the UI and the hardware with flowchart methods in your firmware.
- Simulate the entire system and single step debug to find & fix problems.
- Control the simulation or the real hardware from your phone or tablet.
What can I do with it?
Technical brochureIoT Builder is an add-on module to Visual Designer and Proteus VSM for Arduino, Visual Designer for Raspberry Pi, and Visual Designer for MicroPython. Use it to design a user interface (switches, buttons, dials, displays, charts, etc.) for your mobile device and then program the hardware to work with the remote GUI using high-level methods.
IoT Builder removes the necessity to understand HTML, JavaScript or the TCP/IP plumbing. Transport and communication between the hardware and the remote front panel are abstracted from the user program, leaving you to implement behaviour.
The front panel is drawn in the panel editor and the logic is programmed at a high level with flowchart blocks or Arduino C / Python method calls (Raspberry Pi / MicroPython). IoT Builder is well suited for teaching IoT principles and for rapid prototyping by experienced developers.
How does it work?
IoT Builder enables developers to create applications in which an Arduino, Raspberry Pi or MicroPython-based appliance can be controlled using a mobile phone, tablet or web-enabled device.
The suite comprises a software stack for the hardware, a mobile application, and the Virtual Front Panel editor. Panels are drawn inside Proteus using a library of predefined controls such as buttons, switches, knobs, displays, message logs and graphs. These are controlled in the same way as hardware peripherals in Visual Designer—by dragging action blocks onto a flowchart.
As with all Proteus workflows, firmware and front-panel communications can be fully simulated and, on deployment, the virtual front panel is served to the controlling device by a micro web server on the appliance.
Front Panel Design
The front panel design is the remote user interface to your appliance and what you will see and interact with on your mobile, tablet or internet browser. In IoT builder the front panel design is created by drawing rather than coding. Controls such as buttons, displays and dials are added to the project and then the user arranges them on the panel in a suitable way.
A rich library of controls is pre-supplied and several themes ranging from contemporary to steampunk are available to help create stunning GUI control panels for your project. More advanced users can even use vector graphics tools such as Inkscape to design their own control themes.
The beauty of creating the front panel like this is that each IoT control in Proteus comes with its own driver, making the interaction between the front panel and the firmware program much, much simpler.
Program Control
The firmware program is where we need to interact with both the hardware peripherals of our appliance and the IoT controls on our remote front panel. This needs to work in both directions. For example, a button press on the front panel may turn on an LED in the appliance, but equally sensor data from the appliance may update a display on the front panel.
Since both the appliance and the front panel are designed in Proteus, IoT Builder is able to make life much easier during programming. The project tree contains a list of the peripherals you have added and also a list of the IoT controls in your front panel. Each of these expands to show you high level function calls that allow you to control them. For example, a display control will have a print() method and a temperature sensor will have a readTemp() method. You can then drag and drop these method calls directly from the project tree into your program.
Since the user program is abstracted from much of the low-level complexity, IoT Builder makes the creation of IoT appliances accessible to beginners while remaining productive for Arduino, Raspberry Pi and MicroPython targets.
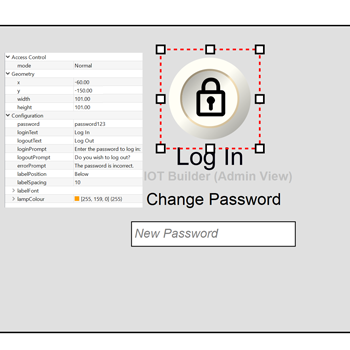
Access Control
You can also set different levels of access control for your IoT Application. A login control enables user elevation to admin status and all controls and tabs of the front panel able to adjust their behaviour (disabled, hidden, etc.) based on whether the user is logged in or not. Two events for login and logout can also be dragged onto the main program allowing you to easily respond to successful changes in user status within the firmware program. This provides a really easy way to teach and learn about access control and user privileges in the context of a connected application.
Simulate and Debug
IoT Builder uses Proteus VSM simulation technology so that your firmware program is simulated along with any electronics you have added to the schematic. The remote user interface is also shown inside Proteus so you can quickly and easily test the interaction of your GUI with your virtual hardware.
Alternatively, you can use the free IoT Controller app for iOS and Android to control the running simulation. When the phone or tablet is on the same network as the PC, the app can discover and connect with the simulated hardware automatically so users can directly control the simulation from their mobile device.
Regardless of which way you work, the full debugging power of Proteus is available so you can set breakpoints in your firmware and single step execute the code to quickly find and fix problems.
Deploy
Once your system has been debugged and tested in simulation you can transfer to the physical hardware at the press of a button (Raspberry Pi requires a one time configuration first). Proteus can detect your Arduino Yun, Uno+ESP8266 or Raspberry Pi hardware if it is on the same network and pre-configure the SSH options for you. Therefore, in most cases you can deploy to the physical hardware wirelessly at the press of a button. Alternatively, in the Arduino case you can connect a USB cable to the Yun which will appear as a programming target in your programmer dialogue.
Regardless of the method of programming, Proteus takes care of transferring the front panel graphics and the web server interface onto the hardware in addition to programming the firmware. After that, you can use our Apple or Android IoT Controller app on your mobile device or your web browser to connect and control the hardware.
- Receive data logged by a MQTT sensor device
- Easy configuration for state changes on MQTT input
- Use mobile devices to output to MQTT system
- Check messages published to the MQTT system
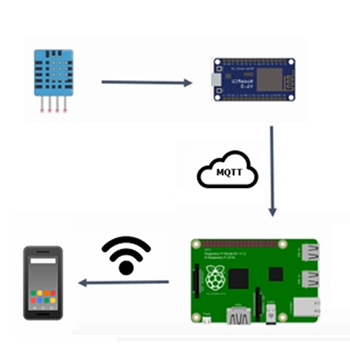
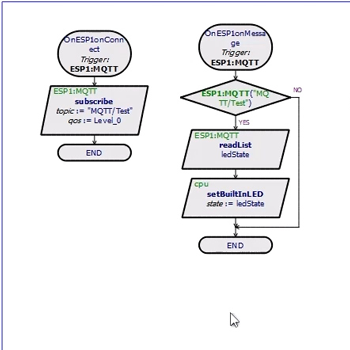
MQTT
MQTT stands for Message Query Telemetry Transport. It is a publish/subscribe, extremely simple and lightweight messaging protocol, designed for constrained devices and low-bandwidth, high-latency or unreliable networks. MQTT is supported directly inside the IoT Builder product, making it easy to set up multi-device systems and manage communications between them.There are two main things you can do with MQTT and Proteus.
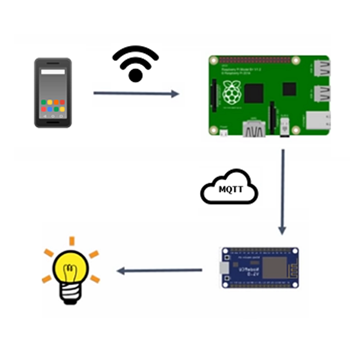
You can send a command to control an output. Here, your mobile device connects with the control device via Wi-Fi and loads the virtual front panel. It then transmits a command intended for the appliance via the remote user interface. This command is sent to the MQTT server. The appliance device will receive the command when it wakes up and checks in with the MQTT server and the firmware will interpret and execute the command.
You can read and publish data from a sensor.Here, your mobile device connects with the Raspberry Pi via Wi-Fi and loads the virtual front panel. It then transmits a command intended for the sensor appliance via the remote user interface. This command is sent to the MQTT server. The sensor device will receive the command when it checks in with the MQTT server and the firmware on the command will be interpreted and executed.
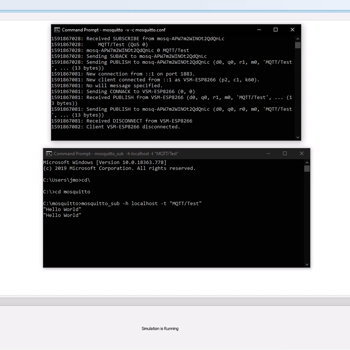
In both cases the MQTT protocol is used as a bridge between the appliance (arduino) and control unit (raspberry pi). Using a broker in the cloud is not essential but means that the appliance can sleep for long periods of time which saves power. In a classroom test environment having the broker on the PC itself is recommended since you'll see debug on the broker command prompt and the networking will be trivial.