- Write your code for the Raspberry Pi!
- Raspberry Pi Hats and sensors can plug and play into Visual Designer projects.

- Breakout boards give more flexibility while still providing simple flowchart interfaces.
- Advanced users can harness the power of Proteus VSM and design their own hardware on the schematic.
Overview
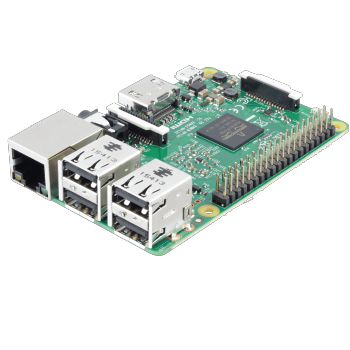
Technical brochureRaspberry Pi® is a popular single chip computer board. The on-board microprocessor is powerful enough to comfortably run a copy of Linux so the Pi can be used for any number of general computing tasks. This does not however detract from it's popularity as the engine of embedded design projects. It is in this embedded design field that the Visual Designer for Raspberry PI product can transform the user experience.
Normally, embedded projects will use a headless Raspberry Pi and the user will connect electronic parts or Raspberry Pi hats to the header pins. The processing power of the ARM chip on the Raspberry Pi is then harnessed by the user to control all of the connected electronics. Visual Designer was built to make both of these tasks fun and accessible to everyone. Electronics selected from the peripheral gallery are auto-placed and connected to the Raspberry Pi on the schematic and high level flowchart blocks make it easy to program the system. Best of all, the user can press play at any time to simulate or single step debug their entire Raspberry Pi circuit.
Project Workflow
Creating and building new embedded gadgets with Visual Designer for Raspberry Pi is a lot of fun and much easier than you might think. Visual Designer is unique in integrating the hardware design and software design into a single software package which vastly simplifies the project design workflow.
The first stage is to select your 'virtual hardware' from the Peripheral Gallery. Choose from a library of popular Raspberry Pi hats from Adafruit and Pimoroni as well as dozens of loose sensors, buttons, LED's and other widgets. When you add these to your project they will automatically be placed on the schematic and connected to the Raspberry Pi. High level control methods for the peripherals will also be added to Visual Designer.
Compile and simulate at the press of the button, making use of our renowned simulation and debugging technology to watch your design come to life on screen.
Finally, transfer to the physical Raspberry Pi hardware with a single mouse click and see it working first time in the real world.
- Design your hardware by selecting hats or breakout boards from the Peripheral Gallery.
- Create the controlling program by drag and drop flowchart design or Python script.
- Simulate the entire system in Proteus with world class debugging tools.
- Program the equivalent Raspberry Pi® hardware at the press of a button.
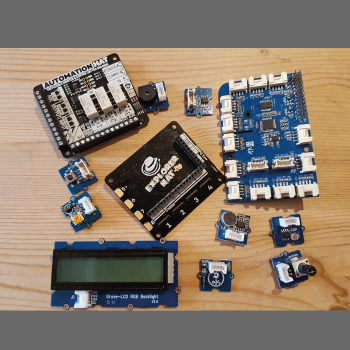
Raspberry Pi Hats
The following is a list of Raspberry Pi hats pre-supplied with the Visual Designer software. When you add one of these shields from the Peripheral Gallery the circuitry will automatically be placed on the schematic for you and connected up to the Raspberry Pi base board. Additionally, Visual Designer will provide some high level access functions to the shield (e.g. drawBitmap(), playAudio(), spinForwards()) to make it easy to control complex hardware from the flowchart. This is the simplest and fastest way to work inside Visual Designer.
Grove Modules
Watch VideoGrove is a modular electronic platform for quick prototyping. Every module has one function, such as touch sensing, creating audio effect and so on. Just plug the modules you need to the base shield, then you are ready to test your ideas.
Visual Designer supports many of the Grove modules and sensors, with auto-placement on the schematic and high level access functions on the flowchart.
Breakout Boards
Breakout boards are interesting and useful small blocks (often single component) of circuitry. When selected from the Peripheral Gallery they are autoplaced on the schematic and connected to the Raspberry Pi board. You also get easy control methods to drive the peripherals from the flowchart. e.g. a read() and a write() function are provided for the SD Card breakout board. Breakouts allow users to be a little more creative but also require a greater understanding of the pin and memory resources of the processor on the Raspberry Pi.
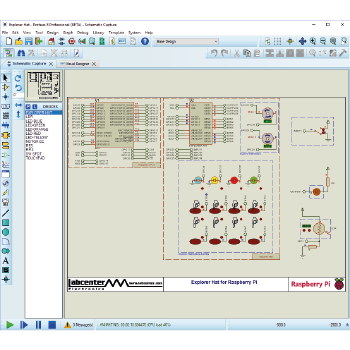
Schematic Design
Advanced users may find that they need more flexibility that than provided by the pre-made hats and breakout modules. Visual Designer also includes the thousands of embedded peripherals developed for Proteus VSM so users can create their own hardware directly on the schematic.
Meanwhile, from a programming viewpoint Visual Designer provides access to the low level Raspberry Pi via CPU methods meaning that you can control the hardware using method calls such as digitalWrite() and
You can even convert the project to Python script and then code your program in Python rather than with flowchart blocks, although you should be aware that in this case you need to have a clear understanding of the supported libraries in Proteus..
Supported Libraries
Unlike Arduino or other Proteus VSM families the Raspberry Pi is a computer, not a microcontroller. It is running a copy of Linux and can perform any number of general purpose computing tasks - none of which are supported in Proteus. Proteus support for Raspberry PI is limited to its role as the engine for embedded design projects.
If you're not sure about this we recommend you stick to flowchart design where everything you do will be supported !
- Supports the smbus library.
- Supports the pygame library.
- Supports the wiringpi libraries.
- Supports the RPi.GPIO libraries.
- Supports the spidev library.