Introduction
Oscilloscopes are an integral part of the engineering toolkit, offering unparalleled insight into the behaviour of electrical signals. From analysing signals to troubleshooting power-supply glitches, these tools provide a view into the “nano-second” domain, enabling a look at what exactly is happening in the fast-moving world of electronic circuits. In this article we will be covering what an oscilloscope is and what it does; and why it is such an important tool in electronic design, development and troubleshooting.
We will also highlight the role of virtual oscilloscopes, such as the one integrated into the Proteus simulation environment, which enables engineers and students to analyse circuits without physical hardware. In the current design landscape, where rapid prototyping and cost efficiency are of great importance, simulation tools have become equally as important. For detailed guidance on using the Proteus Virtual Oscilloscope, refer to our companion article.
What an Oscilloscope is and what it does
Oscilloscopes are high-speed graphing devices that plots how electrical signals change over time, displaying the voltage (y-axis) versus time (x-axis). This visualisation helps engineers, hobbyists, and students understand what is happening in the circuit that they have designed or are working on. Whether you’re working with a circuit that incorporates analogue audio signals, digital pulses, or high-speed communication lines, an oscilloscope makes it possible to see these signals.

The main purpose of an oscilloscope is to help you:
- Measure a signal voltage or multiple signal voltages within a certain time window.
- Analyse the frequency, period and/or duty cycle of signals.
- Troubleshoot your circuits by finding any unexpected waveforms or signal characteristics.
Applications include:
- Analog Signal Analysis:
- Digital Circuit Debugging:
- RF Design:
- Power Electronics:
Measuring the amplitude and frequency of audio signals or sensor outputs.
Analysing clock pulses, PWM signals for motor control or communication protocols like UART, SPI, or I2C.
Verifying the integrity of high-frequency signals in wireless communication systems.
Identifying voltage spikes or ripple in power supply circuits.
Practical examples of configuring a scope and using it for these types of applications in the Proteus simulation are covered in this article
Additionally, most modern oscilloscopes can perform signal analysis functions such as Fast-Fourier-Transforms (see our article on this topic).
Key Features of an Oscilloscope
The key features of an oscilloscope are detailed below. Generally speaking, these are common to all scopes and work the same way in all hardware and software devices. However, since there may be some variance or limitations in capabilities we've written the following with specific reference to the features available in the Proteus simulation environment. All of these features are then covered in more detail in the Oscilloscope Controls article.
- Oscilloscope Channels:
- Voltage/amplitude (y-axis) controls:
- Time (x-axis) control:
- Trigger System:
- Cursors:
- Probes:
Channels are the physical inputs connected to the oscilloscope and can be used to identify your signals when they are being displayed. It is possible for an oscilloscope to have one or multiple channels, with Proteus providing a four-channel virtual oscilloscope. Note that more than one oscilloscope can be added to a design, if analysis of more than four channels is needed.
These controls allow you to increase or decrease the gain of any of the channels to ensure that the signal can be viewed accurately. Basically, these are “zoom” controls for the y-axis (voltage). Proteus allows channel gain from 20V/div to 2mV/div (where the divisions are the horizontal lines making up the screen grid). If you set it to 1V/div and your signal fills 3 divisions, that signal is 3V peak-to-peak.
This controls allows you to increase or decrease the time scale for all signals being viewed to ensure the signals can be viewed accurately. Again, this is basically a “zoom” control for the x-axis (time). Proteus allows a time scale from 200ms/div to 0.5us/div (where the divisions are the vertical lines making up the screen grid). If you set it to 100ms/div and your signal toggles high for 5 divisions, that signal was high for 500ms.
The trigger system, put simply, notifies the oscilloscope when to start the graphing process based on certain settings. These settings include the voltage of the signal, the slope (rising/falling), and the source channel.
Cursors can manually be added to the signal being displayed to measure voltage and time values. Multiple cursors can be added to determine time or voltage differences (deltas).
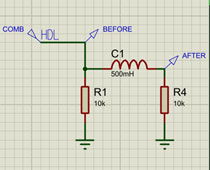
Probes are the physical connections between the oscilloscope channels and the points on the circuit that you would like to visualise. In Proteus these will be placed or routed on the schematic.
When to use an Oscilloscope
While it is possible to use a voltmeter or a multimeter to determine the voltage at a certain point in time, an oscilloscope will show you how a signal behaves over time. This makes a significant difference when you need to diagnose a dynamic or time-based signal in a circuit.
A voltmeter is perfect for measuring static DC voltages, such as:
- Checking battery voltages.
- Confirming power supply rail voltages.
However, it cannot be used to:
- Identify voltage spikes and drops.
- Identify signal noise.
- Measure fast changing signals, such as clock pulses or PWM waveforms.
- Measure time differences (deltas) between events.
This is where an oscilloscope comes in. Oscilloscopes are perfect for visualising signals, especially when they are not static DC signals. It allows far superior analysis capabilities when working with waveforms, such as clock pulses, audio signals, analogue sensor outputs or PWM signals. Although a logic analyser would be better suited, an oscilloscope can also be used to debug microcontroller communication such as UART, I2C, or SPI.
Summary
Oscilloscopes are vital tools for visualizing and analysing electrical signals, making them indispensable in electronic design, development, and troubleshooting. Whether you’re debugging a microcontroller communication protocol, verifying an analogue circuit, or analysing high-speed signals, oscilloscopes provide the insight needed to ensure circuit performance. The Proteus Virtual Oscilloscope takes this a step further by offering a cost-effective, flexible solution integrated into a powerful simulation environment. By enabling engineers and students to test and refine designs without physical hardware, Proteus empowers innovation and accelerates the path from concept to reality.
Continue this article series with a closer look at oscilloscope controls and how to use them.
All content Copyright Labcenter Electronics Ltd. 2026. Please acknowledge Labcenter copyright on any translation and provide a link to the source content on www.labcenter.com with any usage.Get our articles in your inbox
Never miss a blog article with our mailchimp emails
Advanced Simulation
Learn more about our built in graphing and advanced simulation features. Harness the mixed-mode simulation engine in Proteus to quickly test your analogue or digital circuitry directly on the schematic.
 Ask An Expert
Have a Question? Ask one of Labcenters' expert technical team directly.